1 | P a g e
COMPUTER SETUP INSTRUCTIONS
Whether you are upgrading or replacing your current dedicated panoramic x-ray machine computer; please follow these steps to
ensure a successful transition to your new computer.
Panoramic Technical Support can be reached at 800-654-2027 / suppor[email protected] for any questions.
PANORAMIC DENTAL IMAGING
Computer & Software Setup Instructions
for a computer with Windows 10 Professional 64-bit
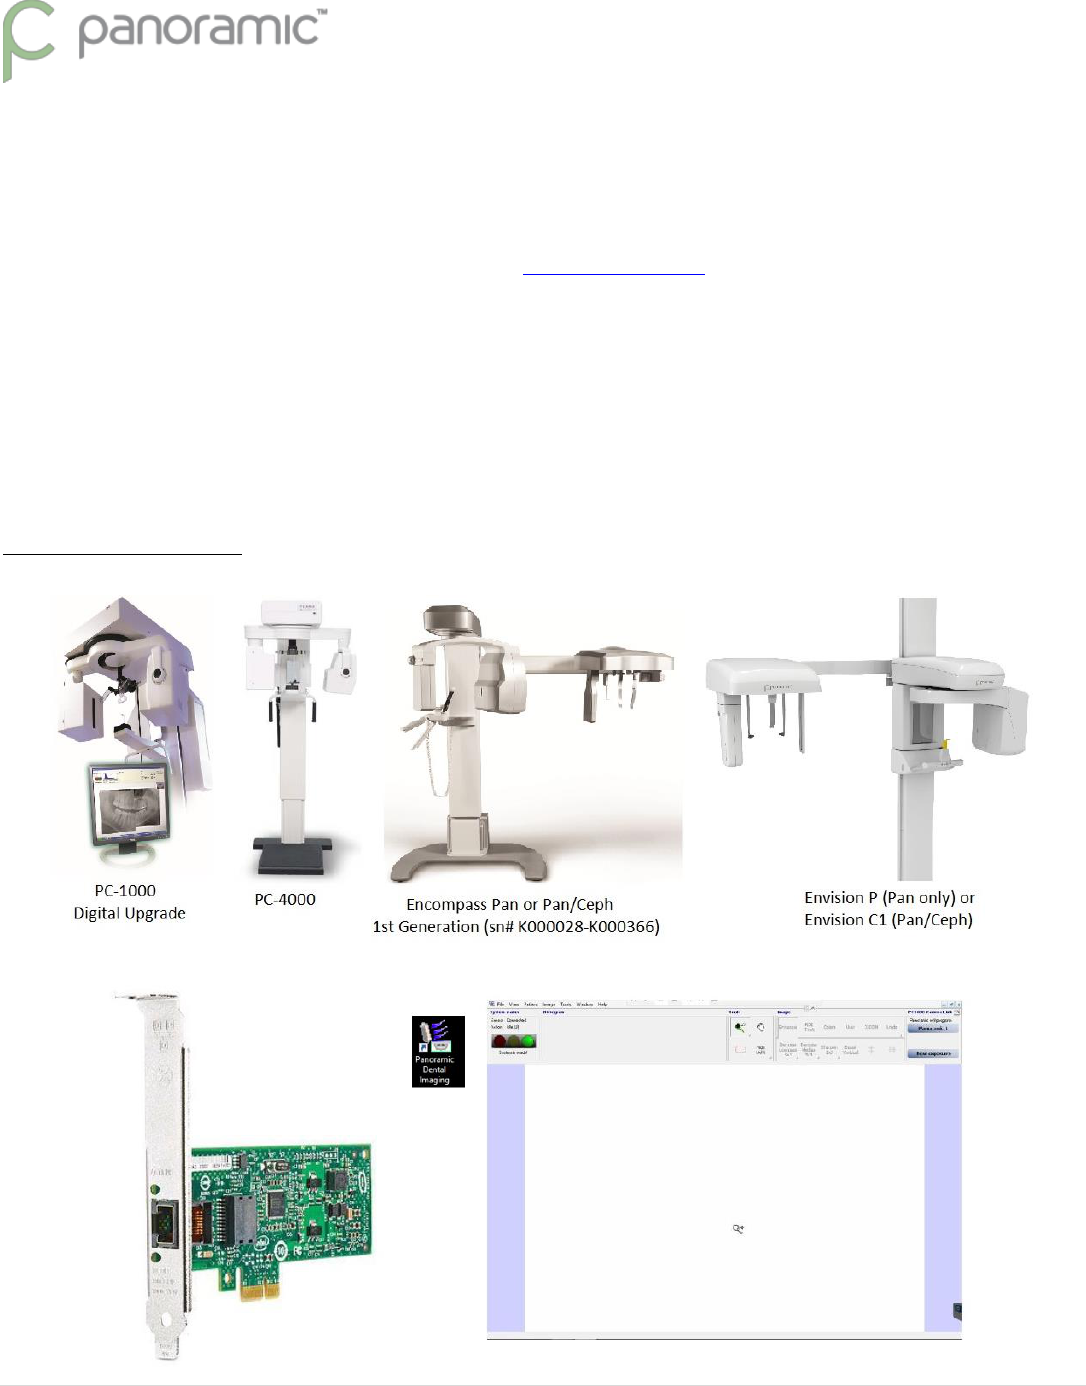
Used with X-ray Machines:

2 | P a g e
Pre-Setup – from the existing computer
Backup Calibration Files
Identify capture card
Computer Information
Setup – on the new computer
Verify Computer Operating System & Type
Disable Sleep, Hibernate, & Fast Startup
Install Software - Panoramic Dental Imaging
Install or Configure Drivers for capture card
Verify or Configure Software Settings– Panoramic Dental Imaging
Restore Calibration Files
Adjust Image Appearance
BACKUP CALIBRATION FILES
On the existing computer, backup the calib & datastor hidden folders:
Required -- C:\ProgramData\Ajat\panoramic\calib\
Optional -- C:\ProgramData\Ajat\panoramic\datastor\
Note: The datastor folder is used to reload recent images taken. It is not used as a long-term backup.
Alternatively these folder can be accessed from the software under the Tools Menu. If calibration files are not available
on the existing computer due to a computer issue/crash, then a new set of calibrations can be created by having an X-
ray Technician visit your office. Call Support for details.
3 | P a g e
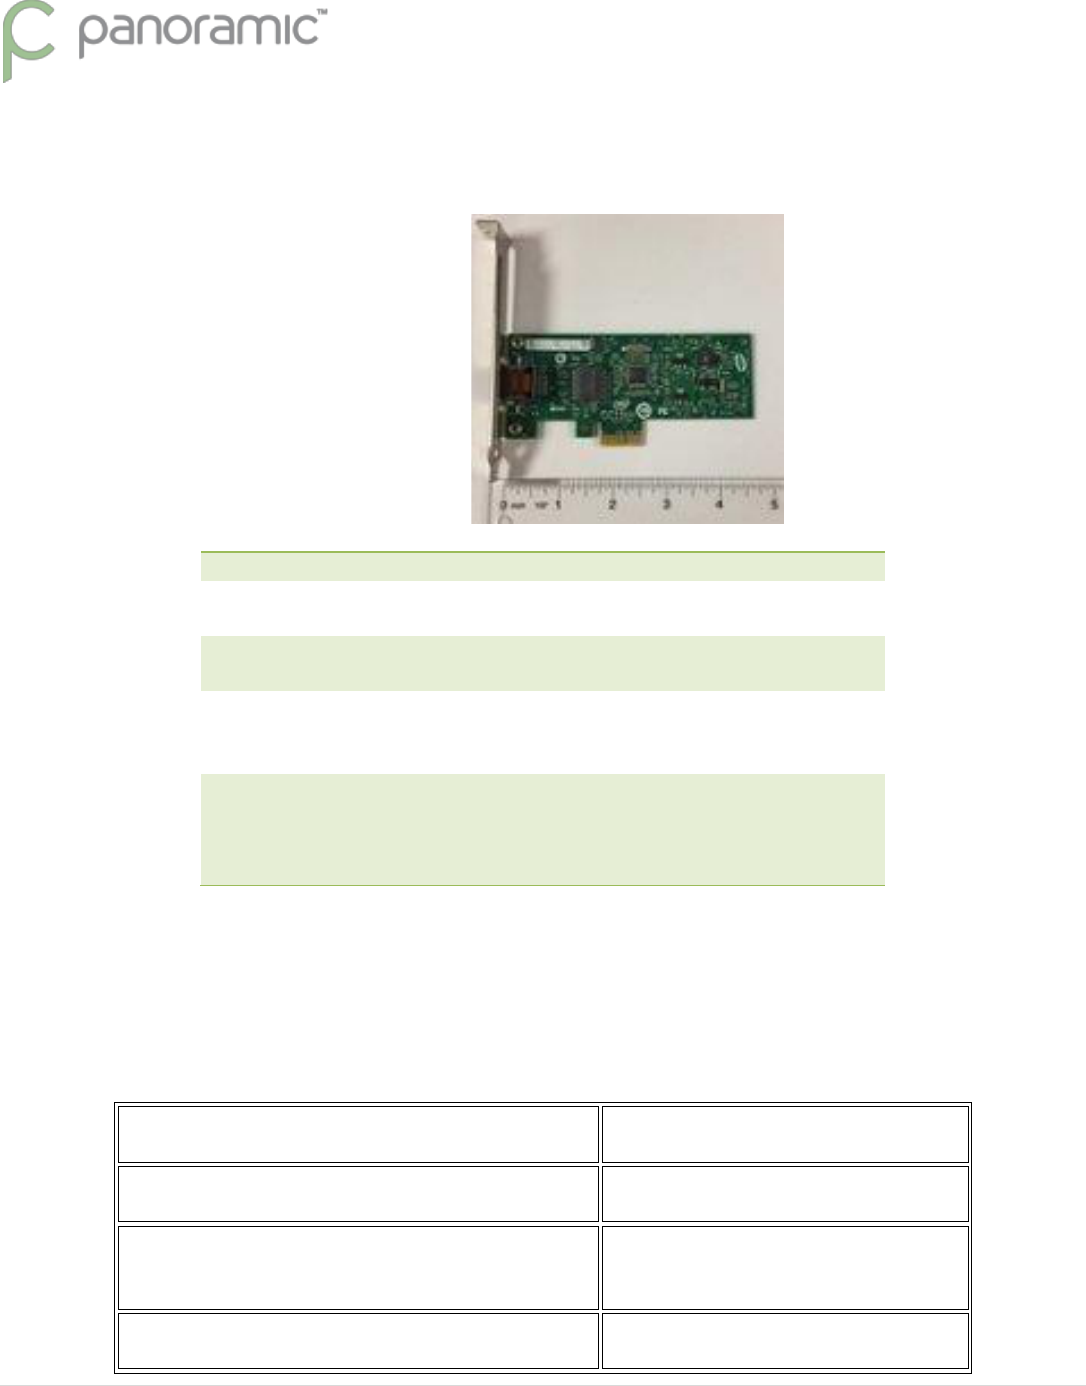
IDENTIFY CAPTURE CARD
Type
Intel CT Desktop Adaptor
Expansion
Slot
PCI Express x1 or x16
Size
Full or Half Height
- call to order different size bracket
Compatible
Operating
Systems
Windows 7 Pro 32/64 bit
Windows 10 Pro 32-bit NOT SUPPORTED
Windows 10 Pro 64-bit Only
Used with
Pano
Machines
PC-1000 Digital
PC-4000
Encompass HF-100 Eagle (2D & 3D CBCT)
Envision P / Envision C1
COMPUTER INFORMATION
The PC used must be a Windows desktop tower. Mac computers & Mac OS not supported. Laptops & All-in-One computers will not
work because the capture card must be installed in the next computer.
Processor (Intel Brand Required)
i5 6th Generation or later
RAM
8 GB
Hard Drive
500+ GB or greater,
7200 RPM or faster
One Available Expansion slot
PCI-Express x16
4 | P a g e
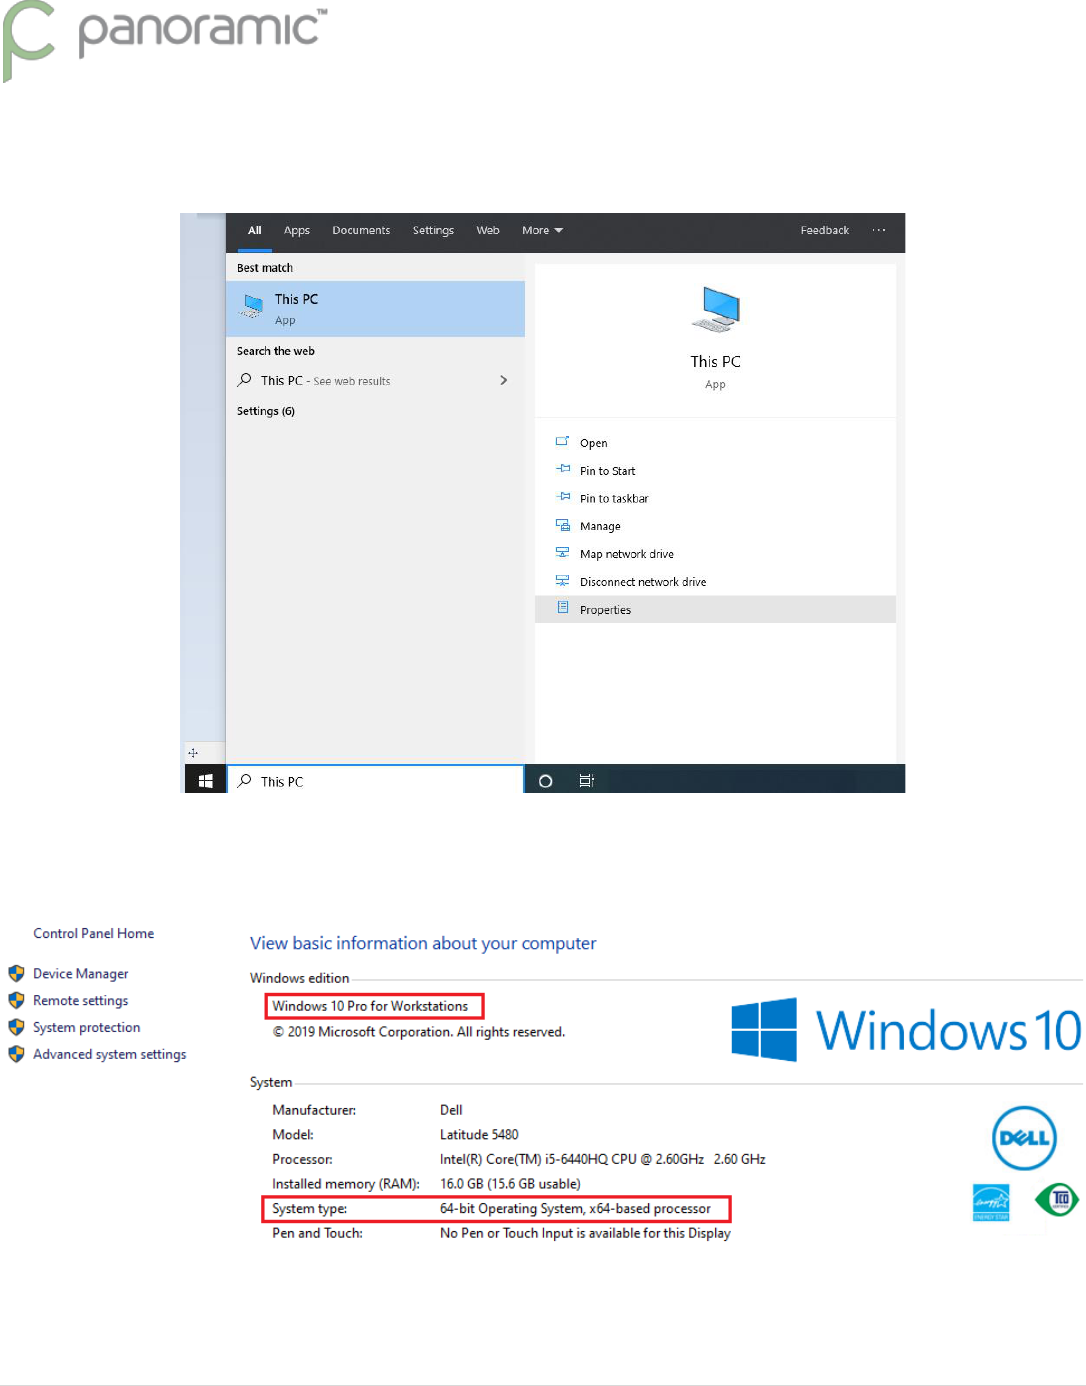
VERIFY COMPUTER OPERATING SYSTEM & TYPE
From the Start Menu, type “This PC” and click on Properties
An Example is shown. Windows 10 Professional, 64-bit Operating System
5 | P a g e
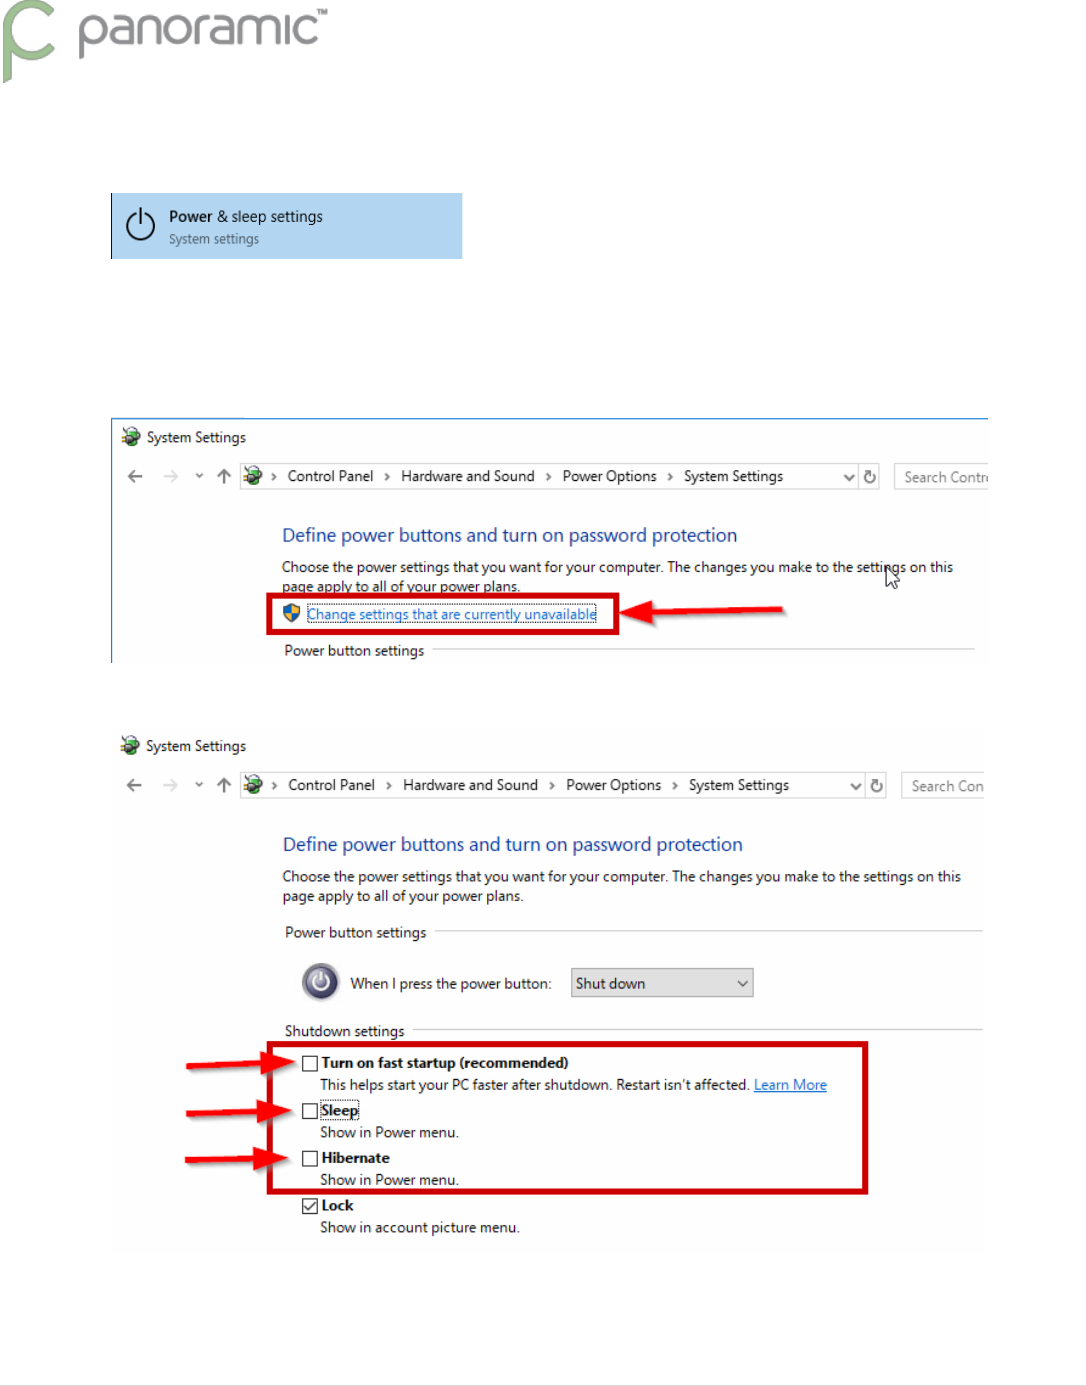
DISABLE SLEEP, HIBERNATE, & FAST STARTUP
a. If PC is windows 10, open the start menu and type “power” click on the “Power and sleep settings”.
b. On the right side of the window, under Related settings, click “Additional power settings”.
c. On the left side of the window, click “Choose what the power buttons do”.
d. Near the top of the window click “Change settings that are currently unavailable”.
e. Uncheck the boxes.
6 | P a g e
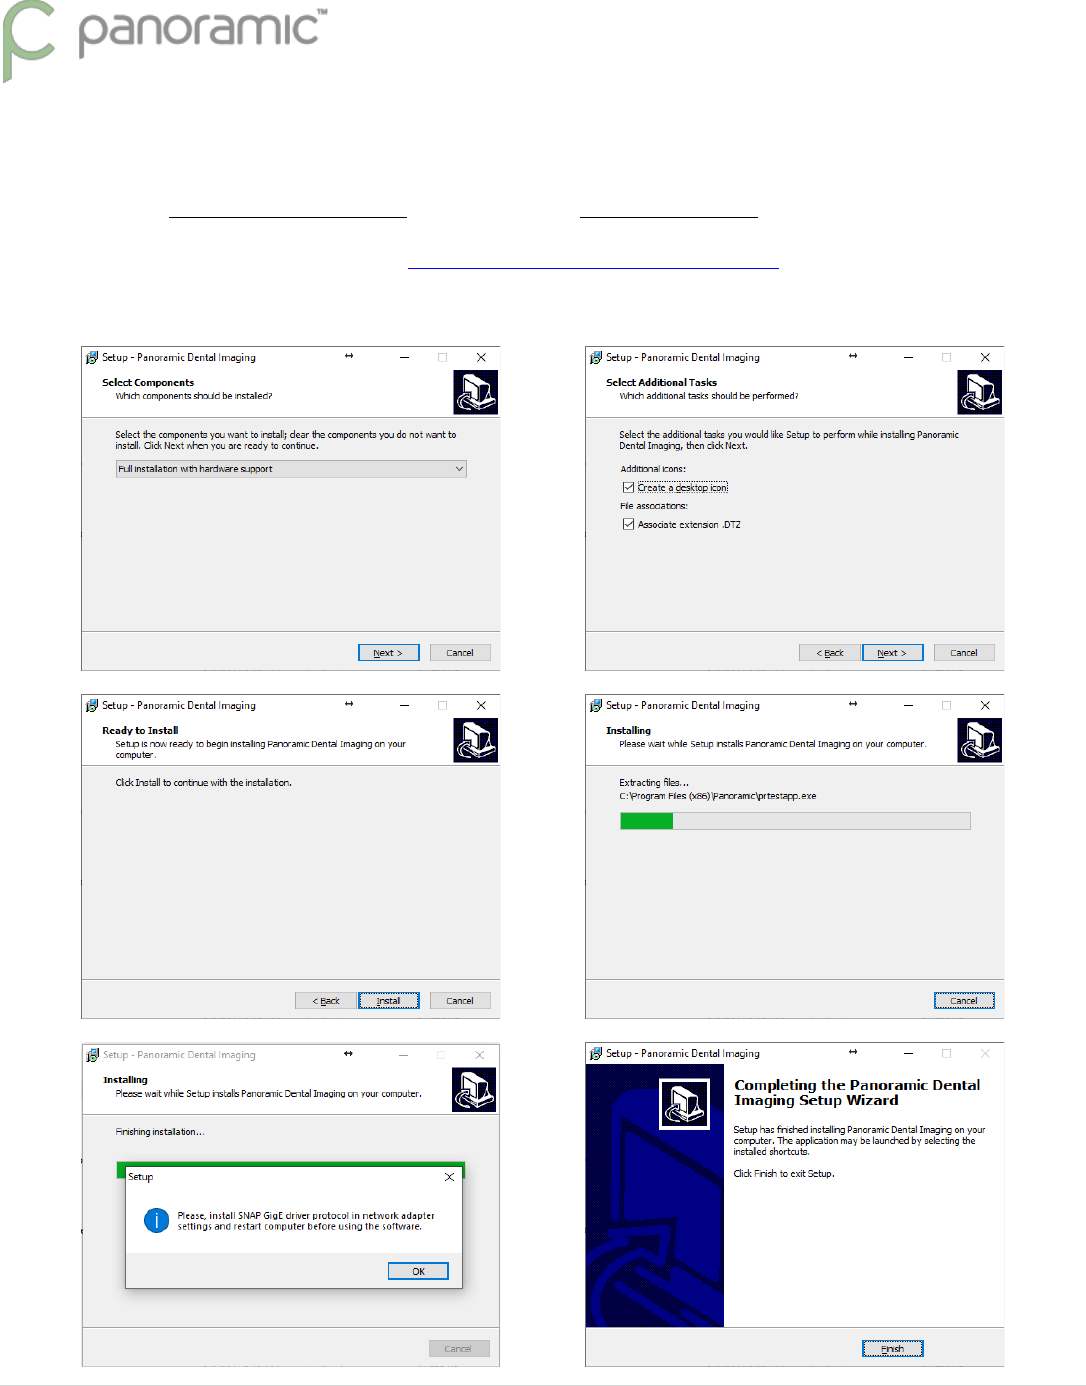
INSTALL SOFTWARE - PANORAMIC DENTAL IMAGING SOFTWARE
Note: If previously installed, or if this is an upgrade from Windows 7, make sure to uninstall any previous versions of the
program, listed as Panoramic Dental Imaging, or formerly called Ajat Dental Imaging.
Download and Run the software Installation. Panoramic Dental Imaging 9.1.2.7600.exe
Use the Default selections by clicking the Next buttons. Here are the screens to show the prompts.
7 | P a g e
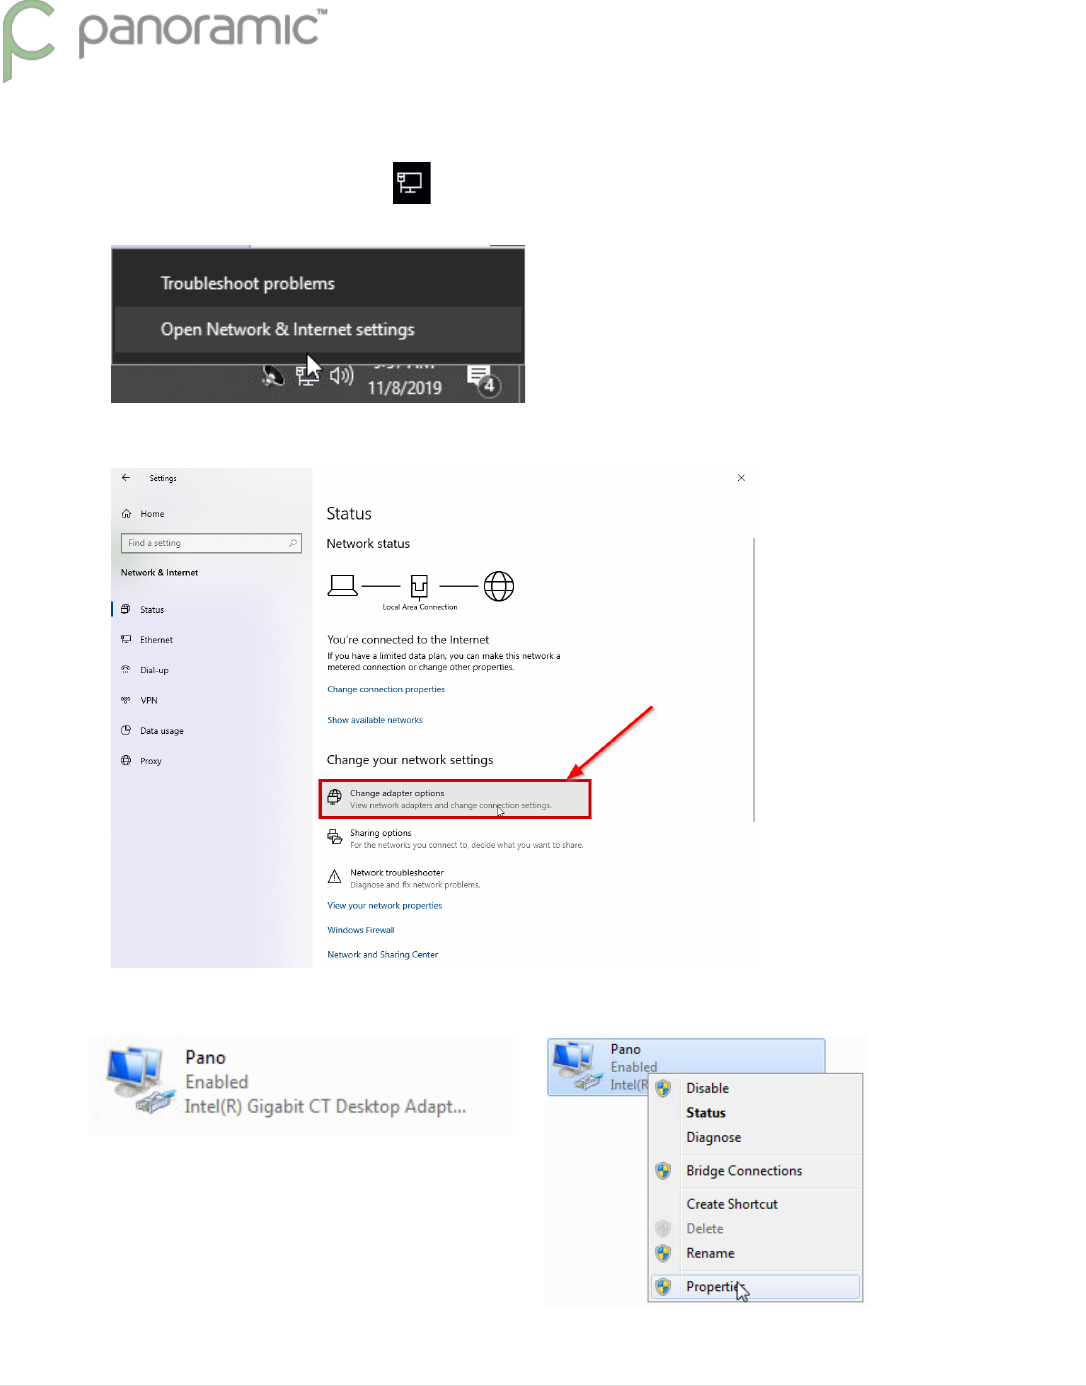
INTEL NIC, CONFIGURE & INSTALL PROTOCOL
a. Right-click on the network icon next to the clock on your taskbar and click “open Network & internet
settings”.
b. Click on “change adapter options”.
c. Right-click on the “Intel gigabit CT desktop adapter” and chose “properties”.
8 | P a g e
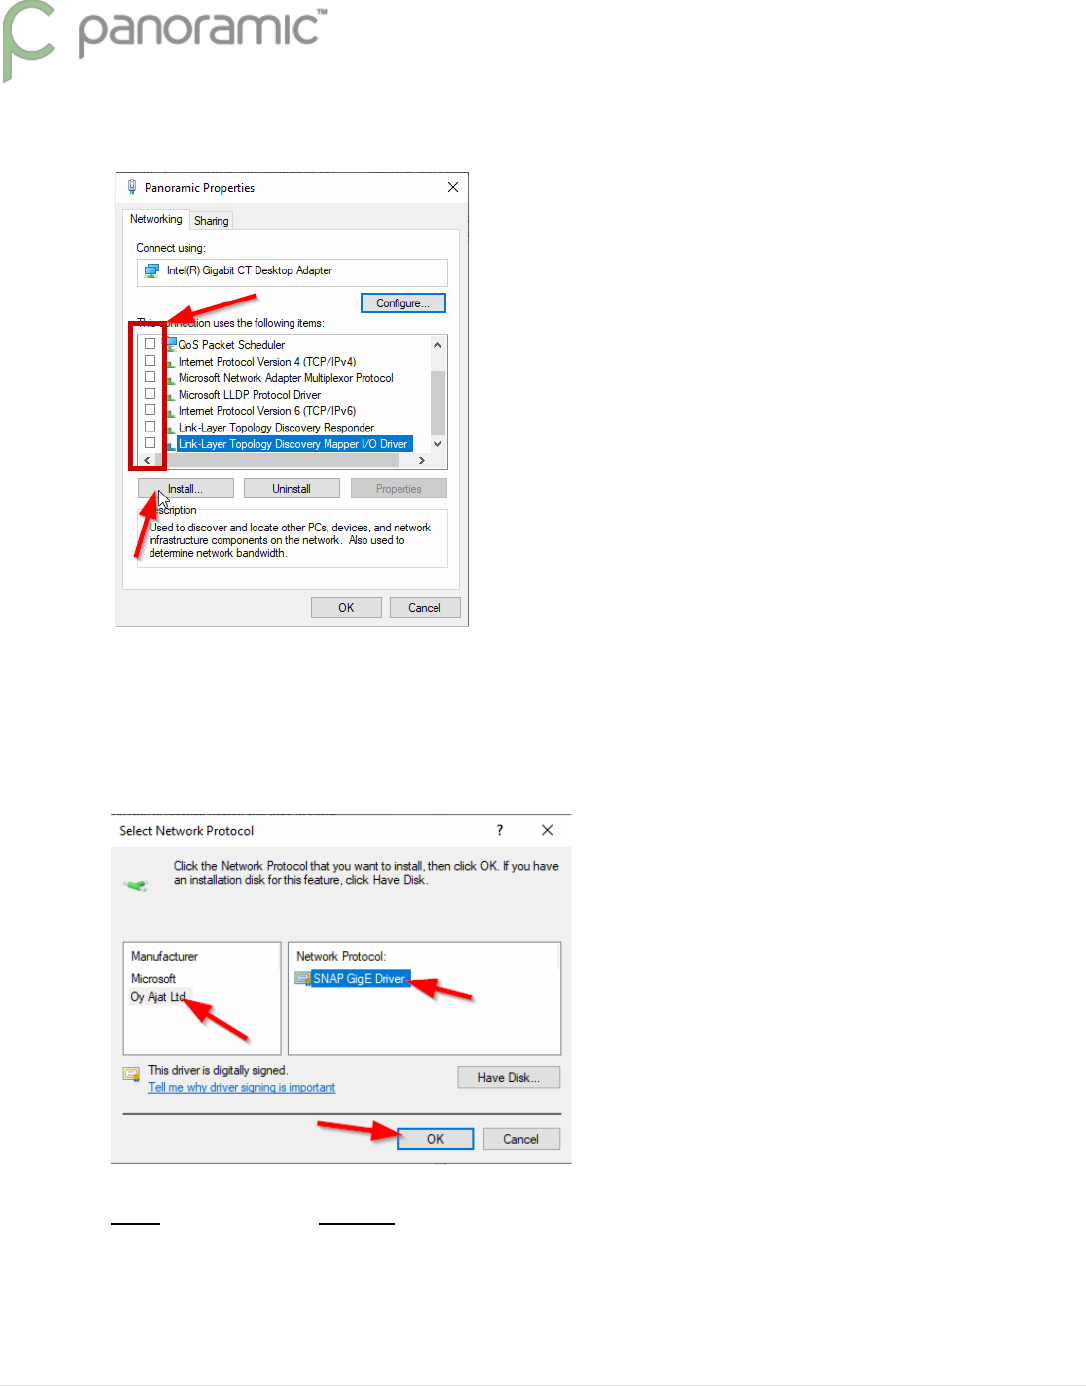
d. Uncheck ALL items/protocols for the network adapter.
e. Click “install” then choose “protocol” then click “add”.
f. Click on the “Oy Ajat Ltd” and select the “SNAP GigE Driver”.
Note: If “Oy Ajat Ltd” is not listed, then you are missing critical Windows Updates.Click “OK” and then
“close” on the adapter properties.
Note: It is Preferred to Uncheck SNAP GigE protocol from any of the other Network Interfaces listed,
especially any other INTEL or Broadcom brand interfaces
g. Right click on the Intel CT Desktop adapter again and go into the properties, and click the “configure” button
in the top right corner.
9 | P a g e
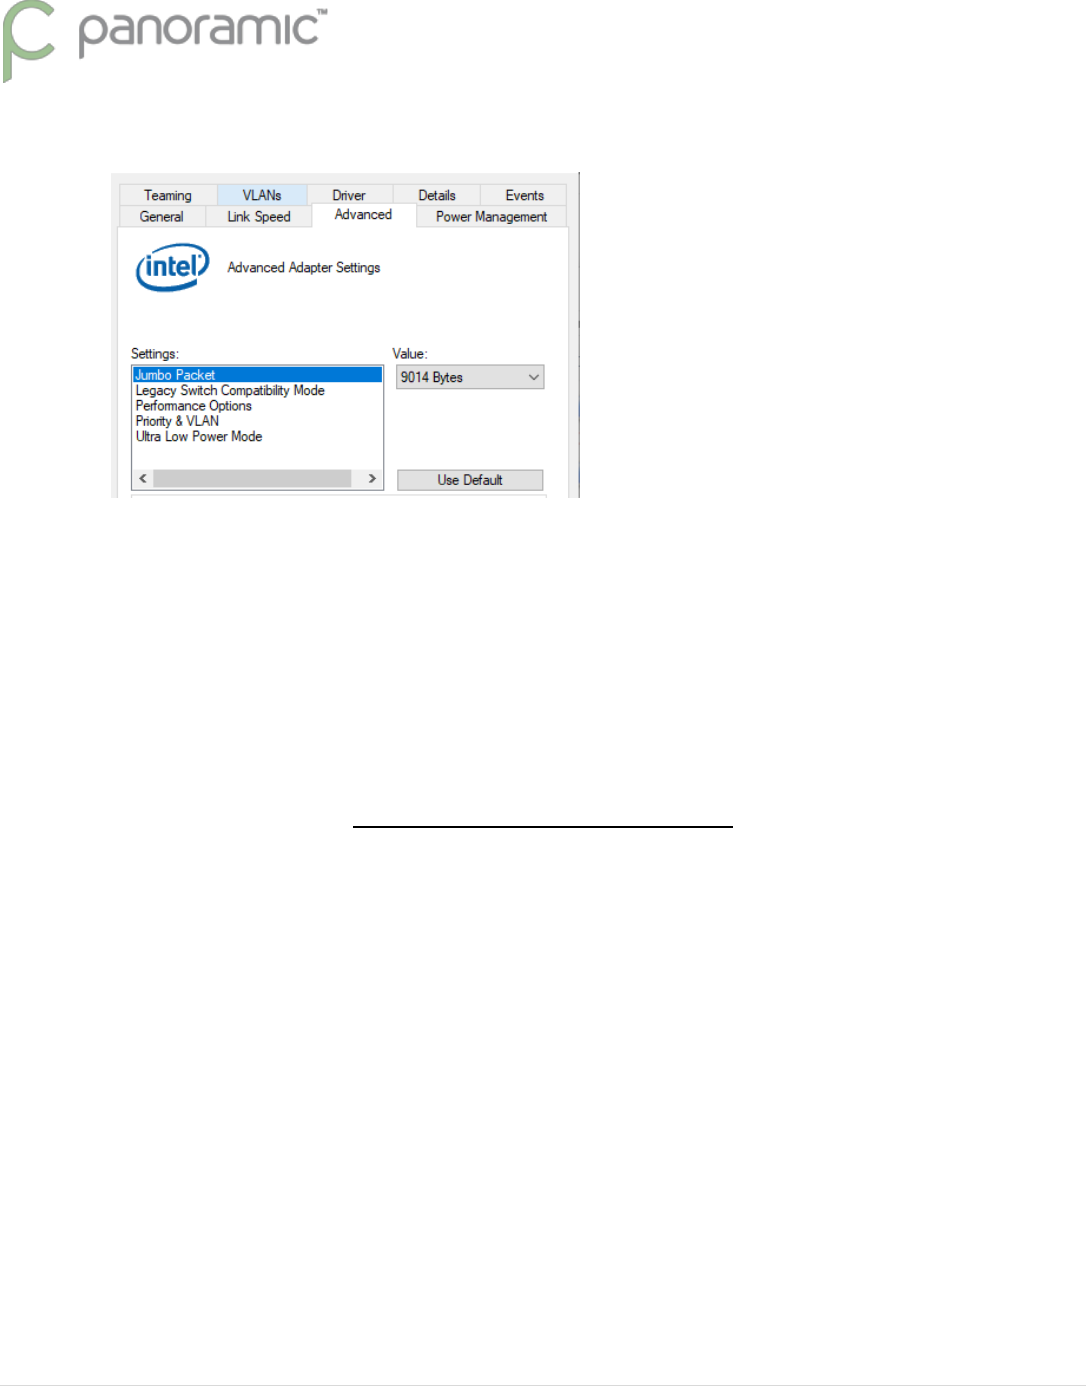
h. Under the “Power Management” tab, uncheck all boxes.
i. Under the “advanced” tab change “Jumbo Packet” to a value of “9014”.
j. Change the “Receive buffers” to a value of “2048”.
If Receive buffers is not found, it might be found under Performance Options
k. Click “OK” to save your changes.
RESTART THE COMPUTER
10 | P a g e
VERIFY OR CONFIGURE THE PANORAMIC DENTAL IMAGING SOFTWARE
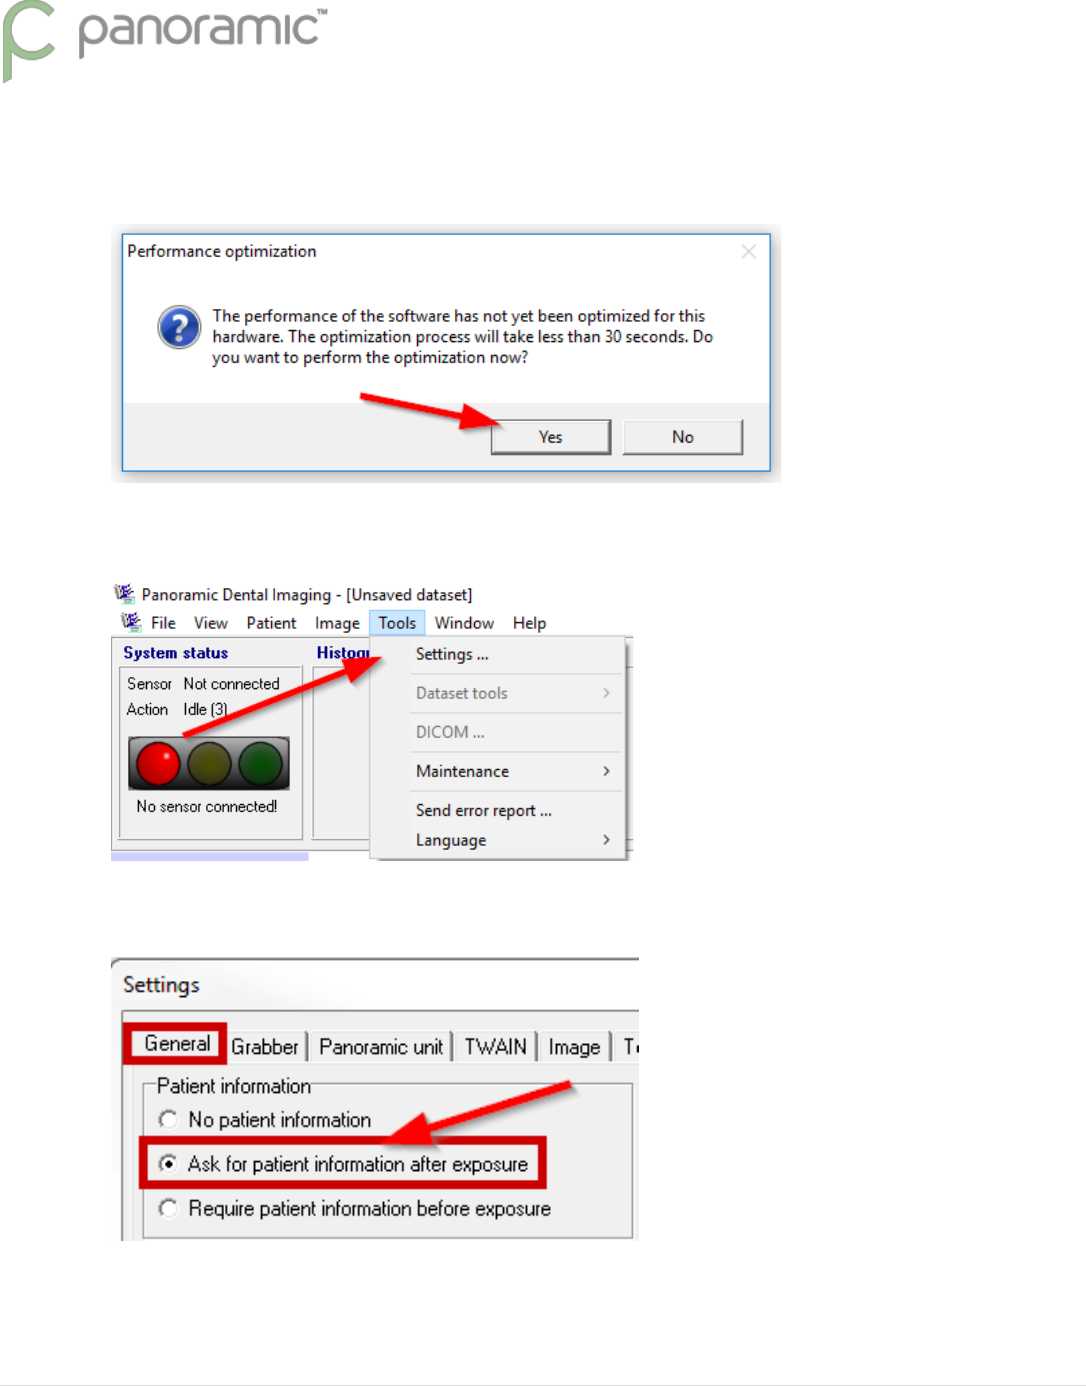
a. Open the “Panoramic Dental Imaging” software If prompted about Performance optimization click Yes.
b. At the top of the software click “Tools” then “Settings…”
c. Click on the “General” tab and select “Ask for patient information after exposure”.
11 | P a g e
d. Click on the “Grabber” tab and Ensure the proper preferred grabber is selected (INTEL gigabit CT desktop
adapter).
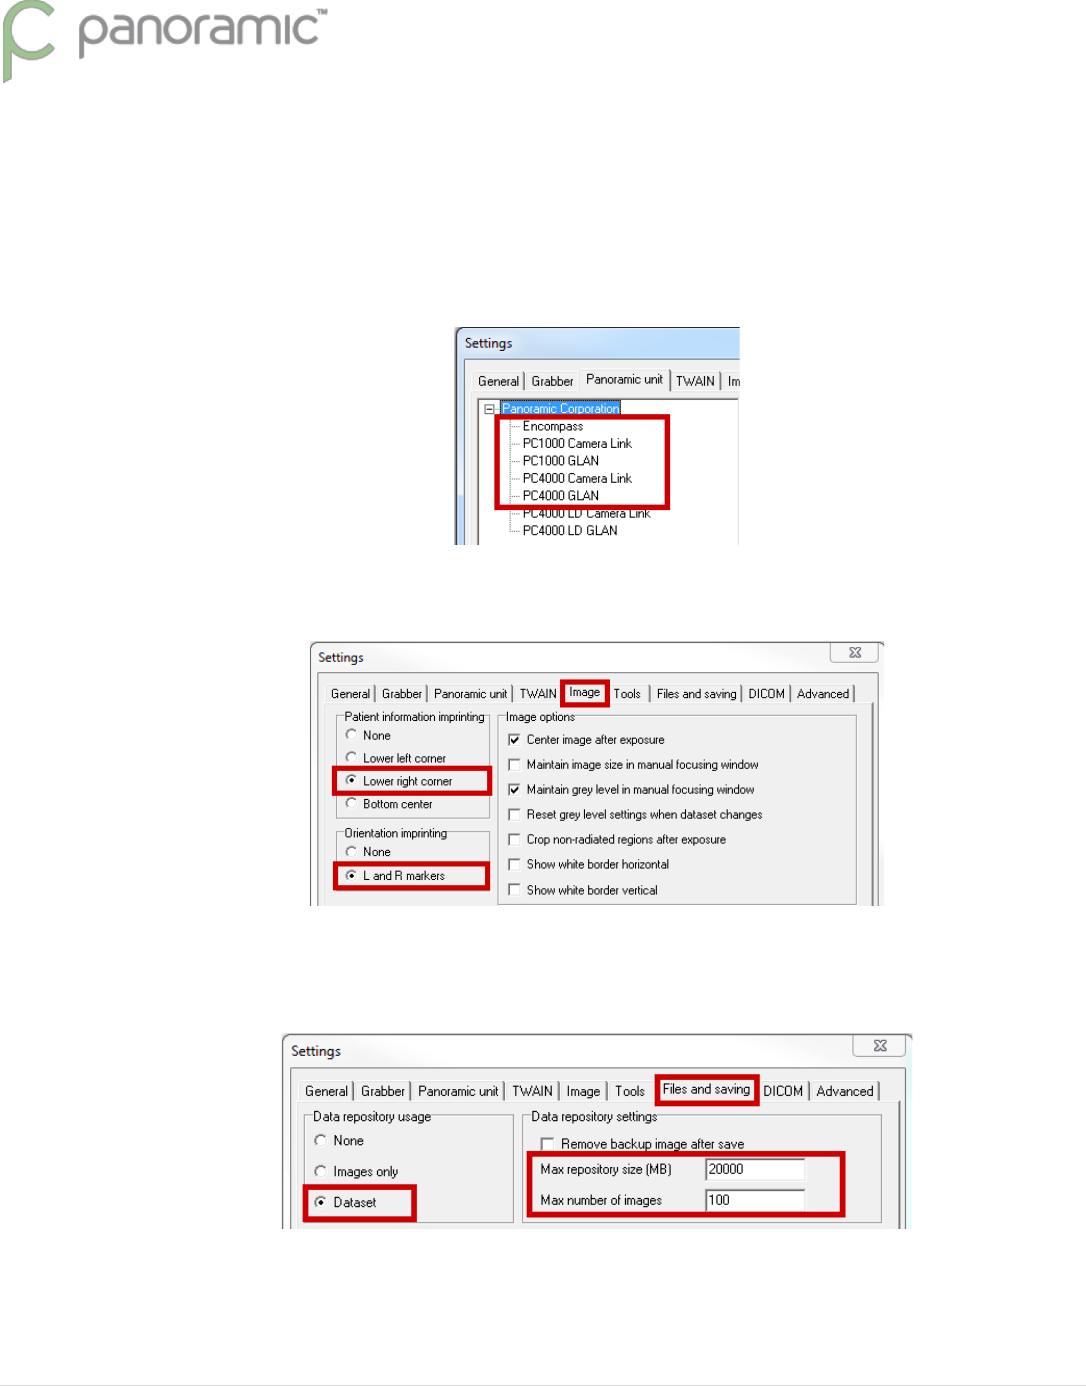
e. Click the “Panoramic unit” tab and chose your type of x-ray machine from the list. If you have the Intel NIC
card, chose the GLAN version of the machine.
*PC1000 GLAN, PC4000 GLAN, Encompass, Envision P, or Envision C1
f. Click the “Image tab” and check the options of “Lower right corner” and “L and R markers”.
g. Click the “Files and saving” tab, and select “dataset”, set the “Max repository size” to “20000”, and the “Max
number of images” to “100” (these numbers can be adjusted to fit computer needs).
h. Click “ok” on the settings windows to save your settings, if prompted to Reboot your PC, click “yes”.

12 | P a g e
RESTORE THE CALIBRATION FILES
a. The calibration files should have been backed up from the previous computer. Copy all files in that folder to
the same location on the new PC.
C:\ProgramData\Ajat\panoramic\calib\
C:\ProgramData\Ajat\panoramic\datastor\
Note: This folder is created automatically after the software has been setup/configured. Make sure to
not copy the folder into itself. Example: C:\ProgramData\Ajat\panoramic\calib\calib\ (wrong)
b. Power the X-ray machine Off, or ensure the sensor is powered off, wait 5 seconds, and power back On.
c. Verify GREEN CONNECTION status light in the TOP LEFT corner of the software program
Call Panoramic Support if problematic. 800-654-2027 opt. 1 for the Service Dept.
Important Note: If the calibration date is older than 2 years, please contact Technical Support or your Local Certified
Technician for recalibration. Panoramic Corporation strongly recommends Recalibration of the X-Ray unit & Software
every 2 years. If you cannot see the Date modified column, then you need to change the view of the folder to Details.
13 | P a g e
ADJUST IMAGE APPEARANCE
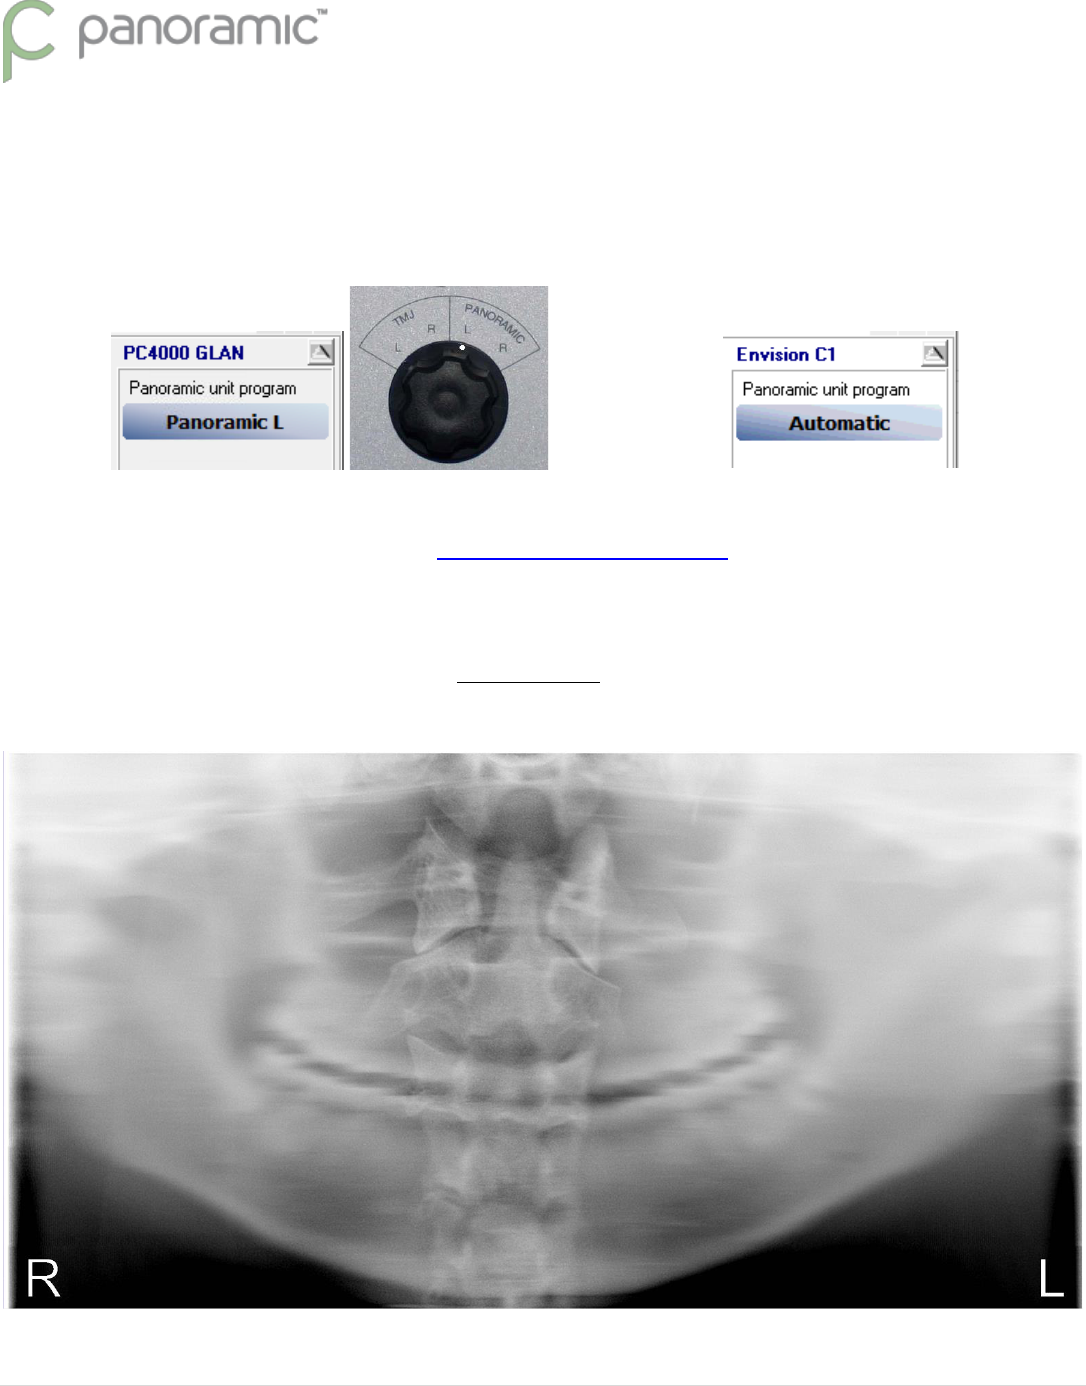
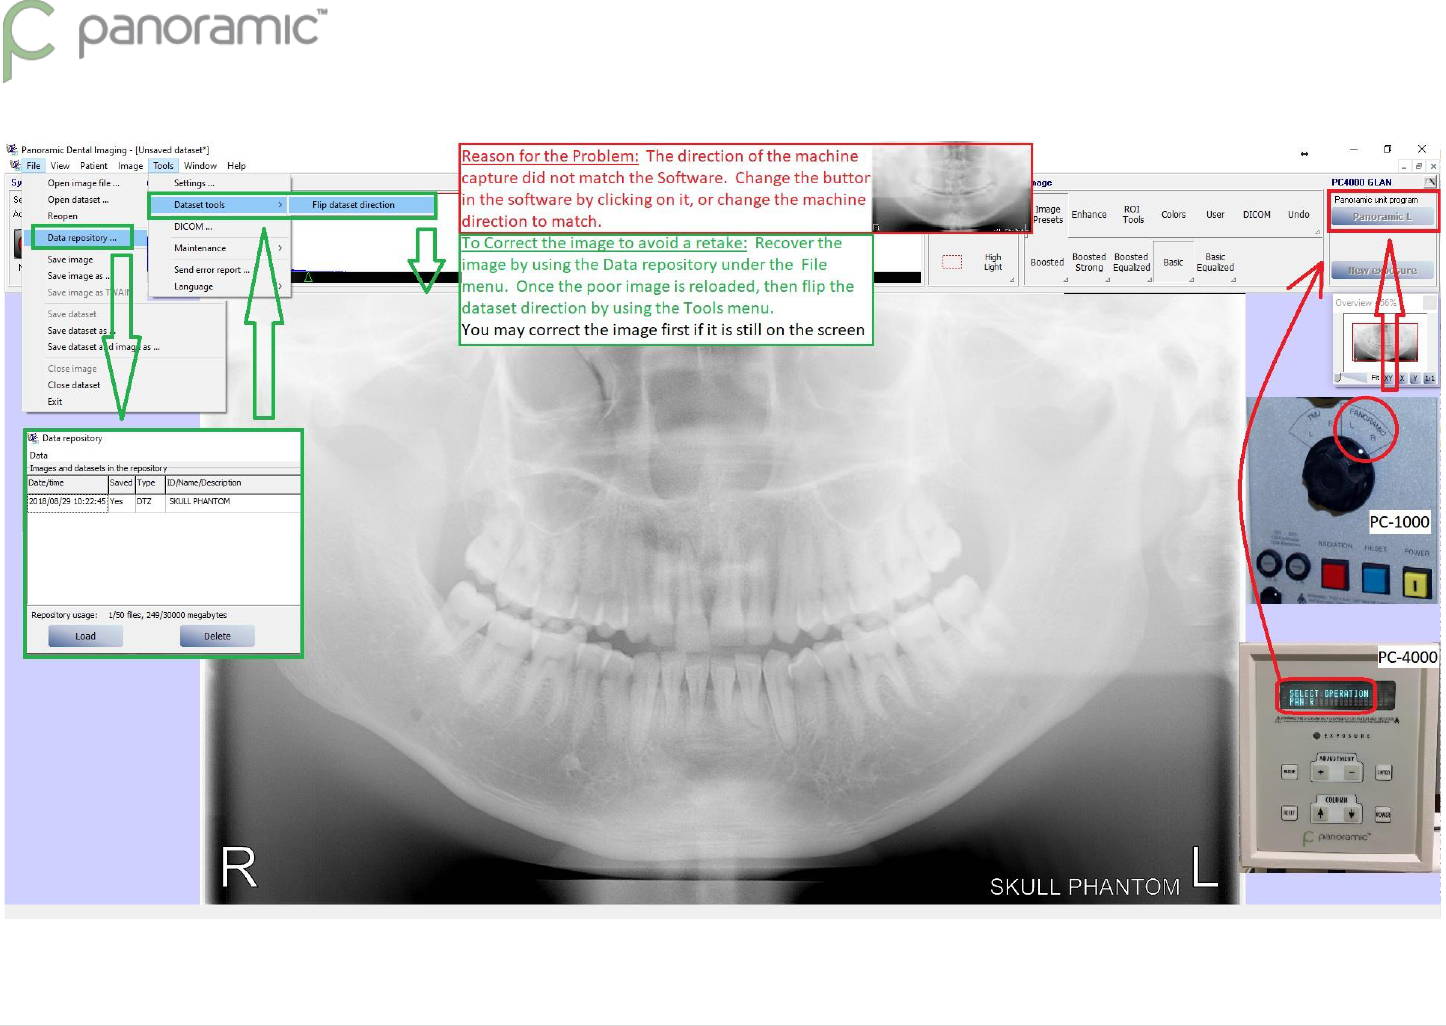
a. Ensure the Software direction L/R (top right of screen) matches the Machine direction L/R (side panel)
Machines Encompass, Envision P, and Envision C1 are set to Automatic
A green connection to the software/sensor is required to change this button direction
a. Because this is a new computer the images by default will be very light until adjusted. You can follow the
instructions listed on page 20 of the Guide to getting the best images to adjust the default image
adjustments
How to Correct VERY blurry images from using the wrong direction captured
Only for PC1000 & PC4000 units.
14 | P a g e
15 | P a g e
Helpful hints on making your panoramic images better!
After taking a panoramic x-ray there are two main tools that we prefer everybody use before the image
is saved. Those two tools are the Equal Vertical tool and adjusting the Histogram graph.
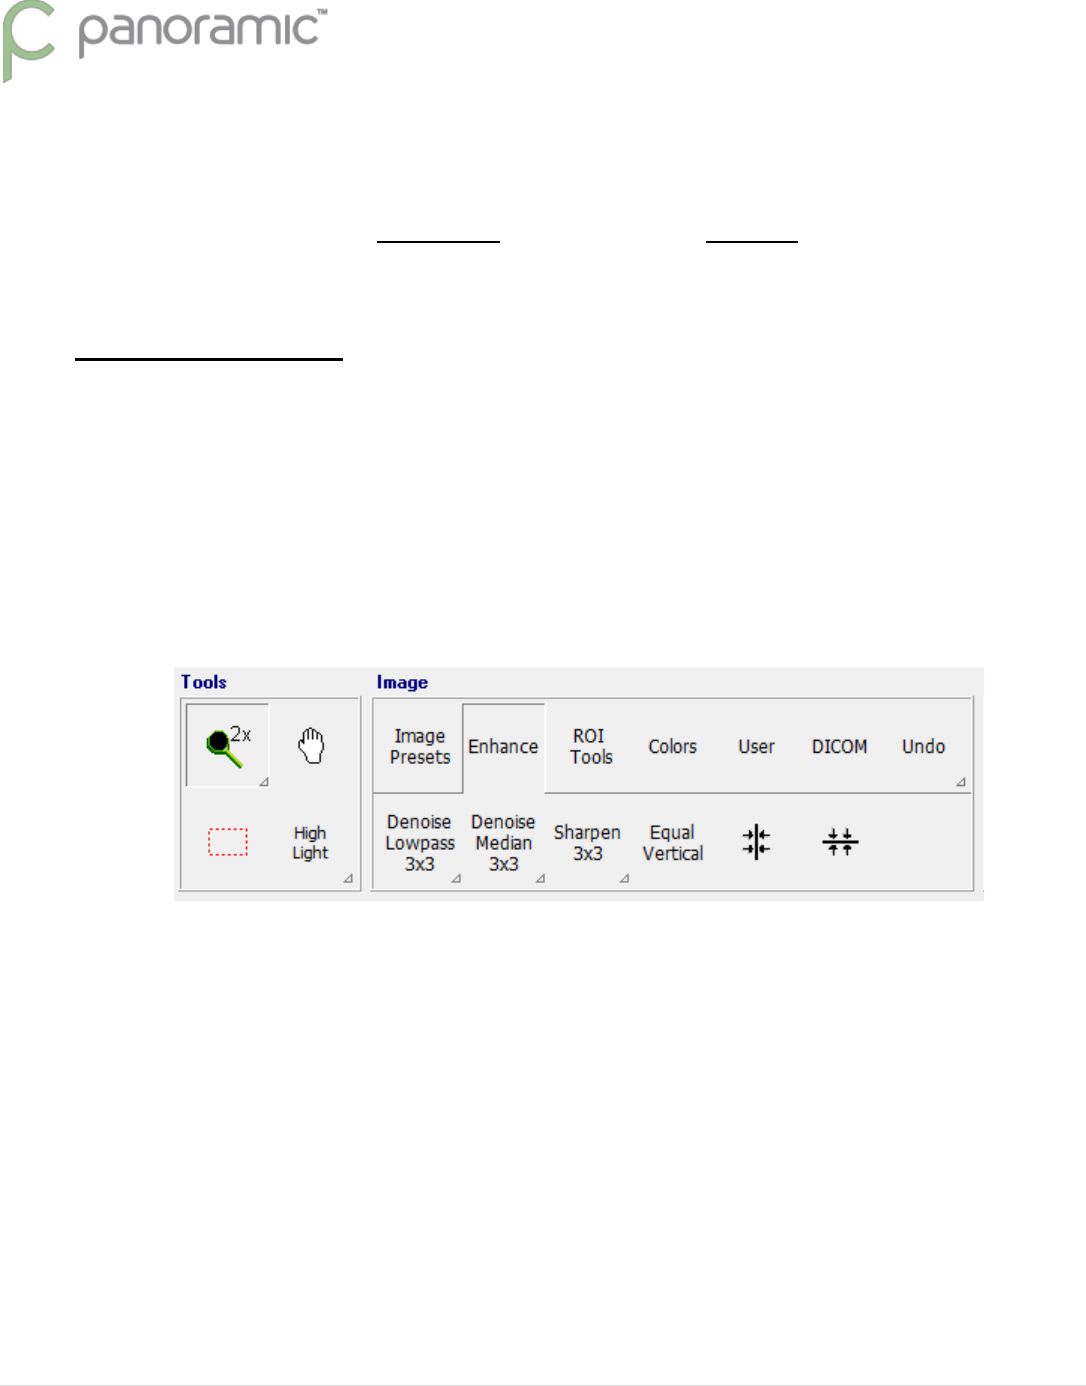
Equal Vertical tool
Description: The Equal Vertical tools will equalize the columns in the image. This should be the first tool
used after taking a panoramic x-ray. For example, the center of the image is generally lighter because of the
spinal shadow due to the position of the patient. To help minimize this “shadow” of the spine in the image,
using the tool will darken the middle and lighten the sides, balancing the difference in darkness across the
image.
The Equal Vertical tool is located under the Enhance button to view the buttons beneath.

16 | P a g e
Below is an example when using the Equal Vertical tool.
Before the Equal Vertical tool is used:
After the Equal Vertical tool is used:
17 | P a g e
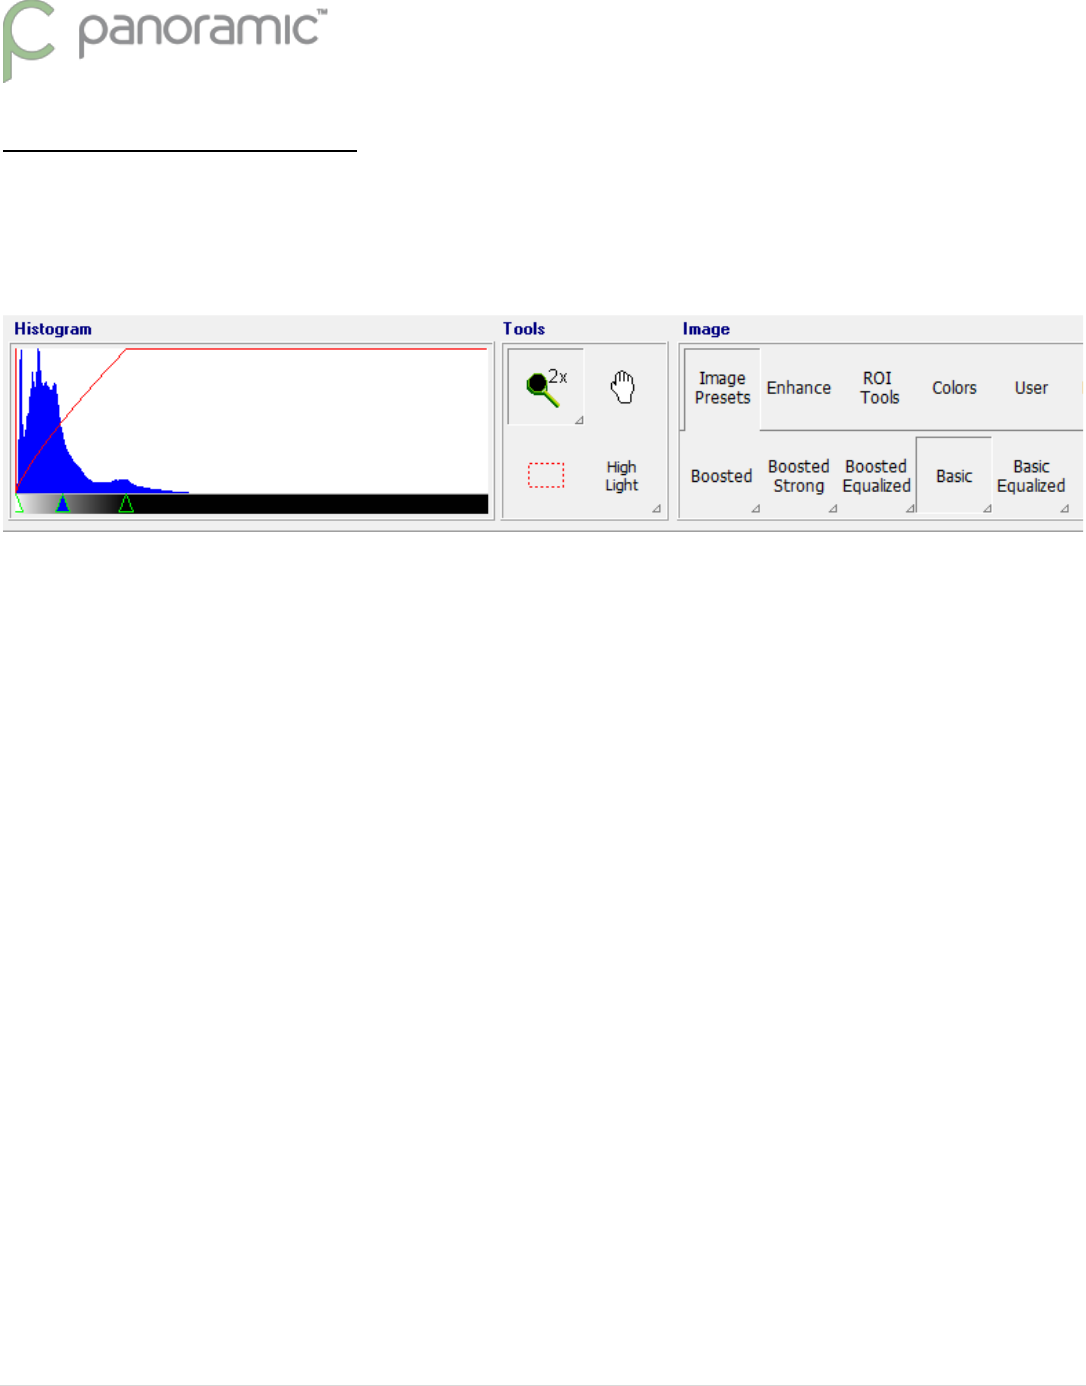
Adjusting the Histogram
After the Equal Vertical tool is used, it is best to adjust the brightness and contrast to get the best detail out of
the x-ray. This is the second tool that should be used after taking a panoramic x-ray. This tool is called the Histogram.
As seen in the examples above, there are three small green triangles at the bottom of the tool. Moving these
triangles side-to-side will adjust the brightness and contrast values of the image. To move the triangles simply left-click
the triangle using the mouse and drag them side to side. When the triangle is in its desired position, release the left-
mouse button. Be careful not to overlap the triangles when adjusting them, otherwise the software will not know which
triangle to move. To best learn this tool, adjust the triangles and notice the difference in the image after the
adjustment. Utilizing this tool can greatly improve the quality of the x-rays.
The farthest right triangle, usually seen as green outline with black in the center, controls the contrast or
darkness (dark levels) of the image. The default position for this triangle is against the far right side. This should be the
first triangle to be moved.
The middle triangle, usually seen as the green outline with blue center, controls the brightness of the image.
The default position for this triangle is right in the center. This is the second triangle to be moved.
The farthest left triangle, usually seen as green outline with white center, controls the whiteness (white levels)
of the image. The default position for this triangle is against the far left side. This triangle should normally be ignored
and kept in its default position.
Since every individual has a different opinion about getting the best detail with an x-ray, there is no set of rules
of how the x-ray should look. Therefore the best way to decide this ask the doctor (or talk amongst the group) and
decide what key parts in the x-ray are needed to be in focus and given attention to. The person that will usually take the
x-ray needs to be aware of what is needed, otherwise most (if not every) x-ray will not be to the doctor’s liking. This is
why communication is key when viewing/saving x-rays.
18 | P a g e
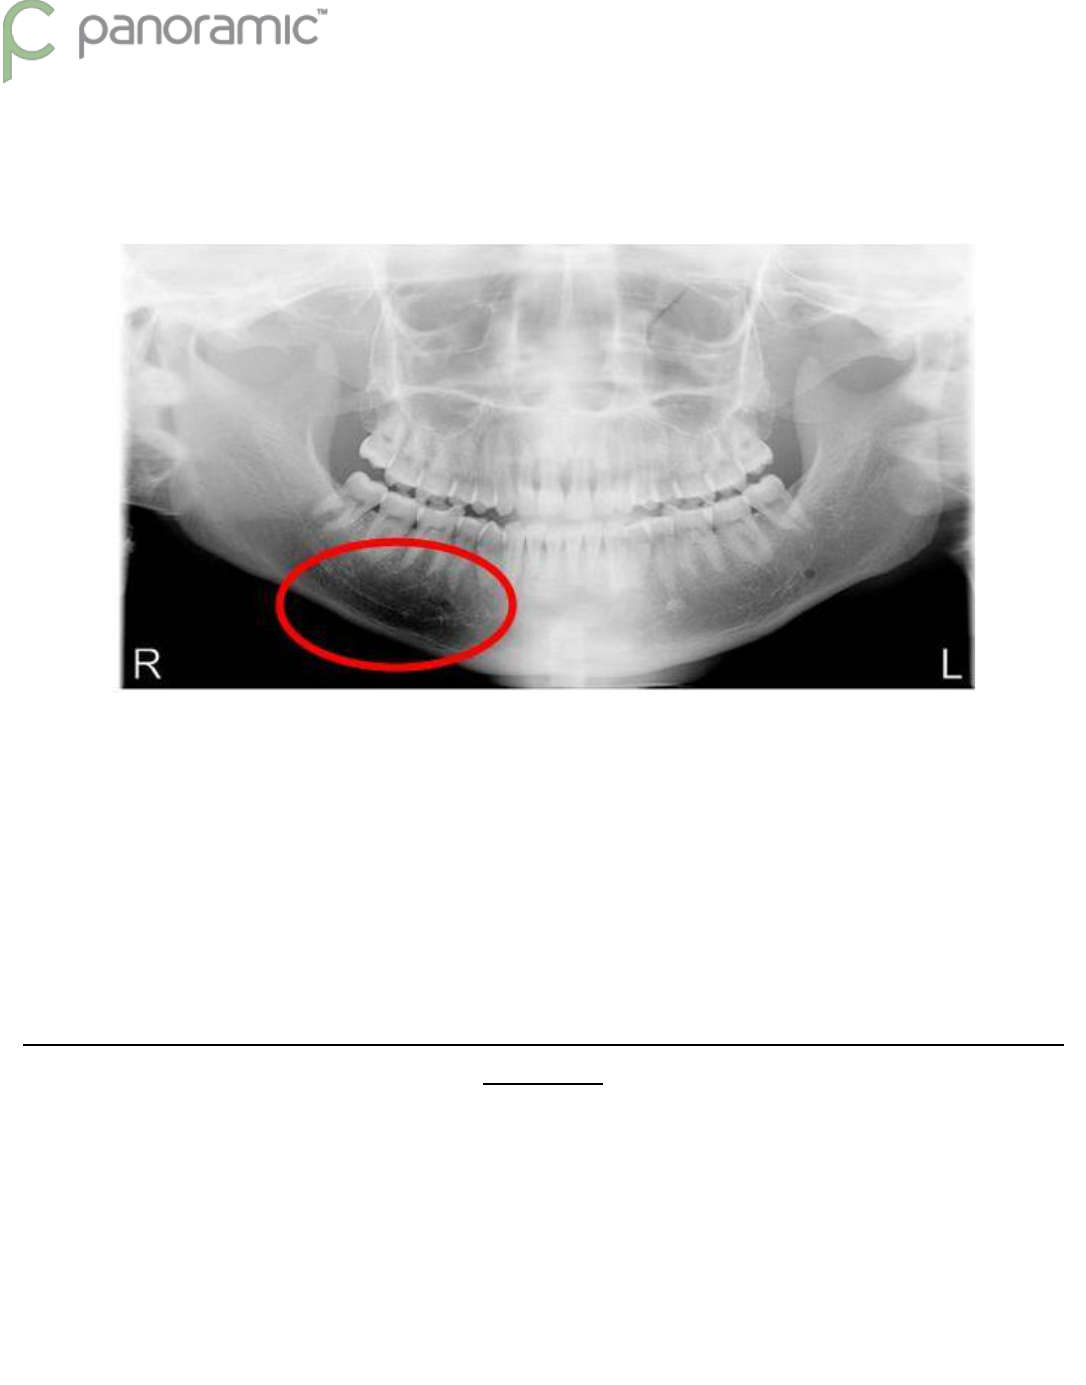
As an example on how to use this Histogram tool, adjust the contrast (most right) triangle from right to left until
you start to see “burn out” in the jawbone or skeletal figure. (See below)
Then adjust the brightness (middle) triangle side-to-side until you get the detail and clarity in the roots of the
teeth. Getting the detail desired may require you to re-adjust the contrast and brightness triangles more than once. Do
not be afraid to take some time if you feel you can get a better image. If you are unsure ask the doctor or another staff
member if the detail you have is acceptable or not. There is no wrong adjustment; it all falls on personal preference.
Note: Patient positioning and correct kvp usage directly reflects the potential detail seen in
the image.
19 | P a g e
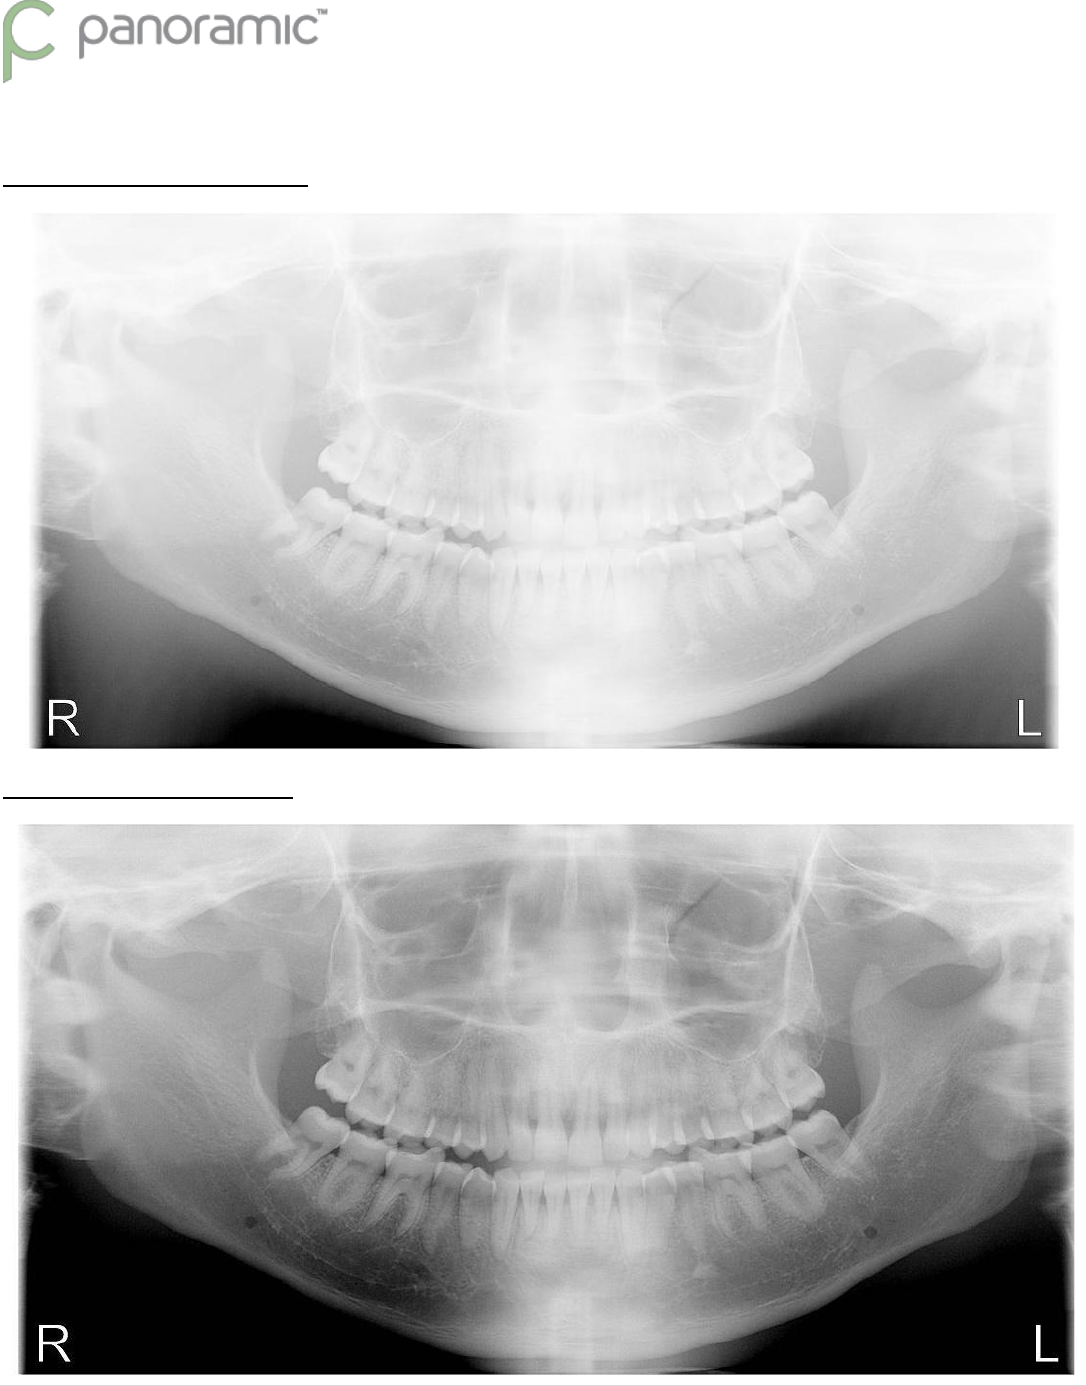
Below is an example when using the Histogram (or Image controls) tool.
Before the Histogram tool is used:
After the Histogram tool is used:
20 | P a g e
Troubleshooting Not Connected Status (GLAN)
Estimated Time: 2-20+ minutes
Note: Some instructions reference the steps used in the installation guide mentined above.
These steps will be easier for an IT person to follow having computer experience.
Check Software Diagnostics
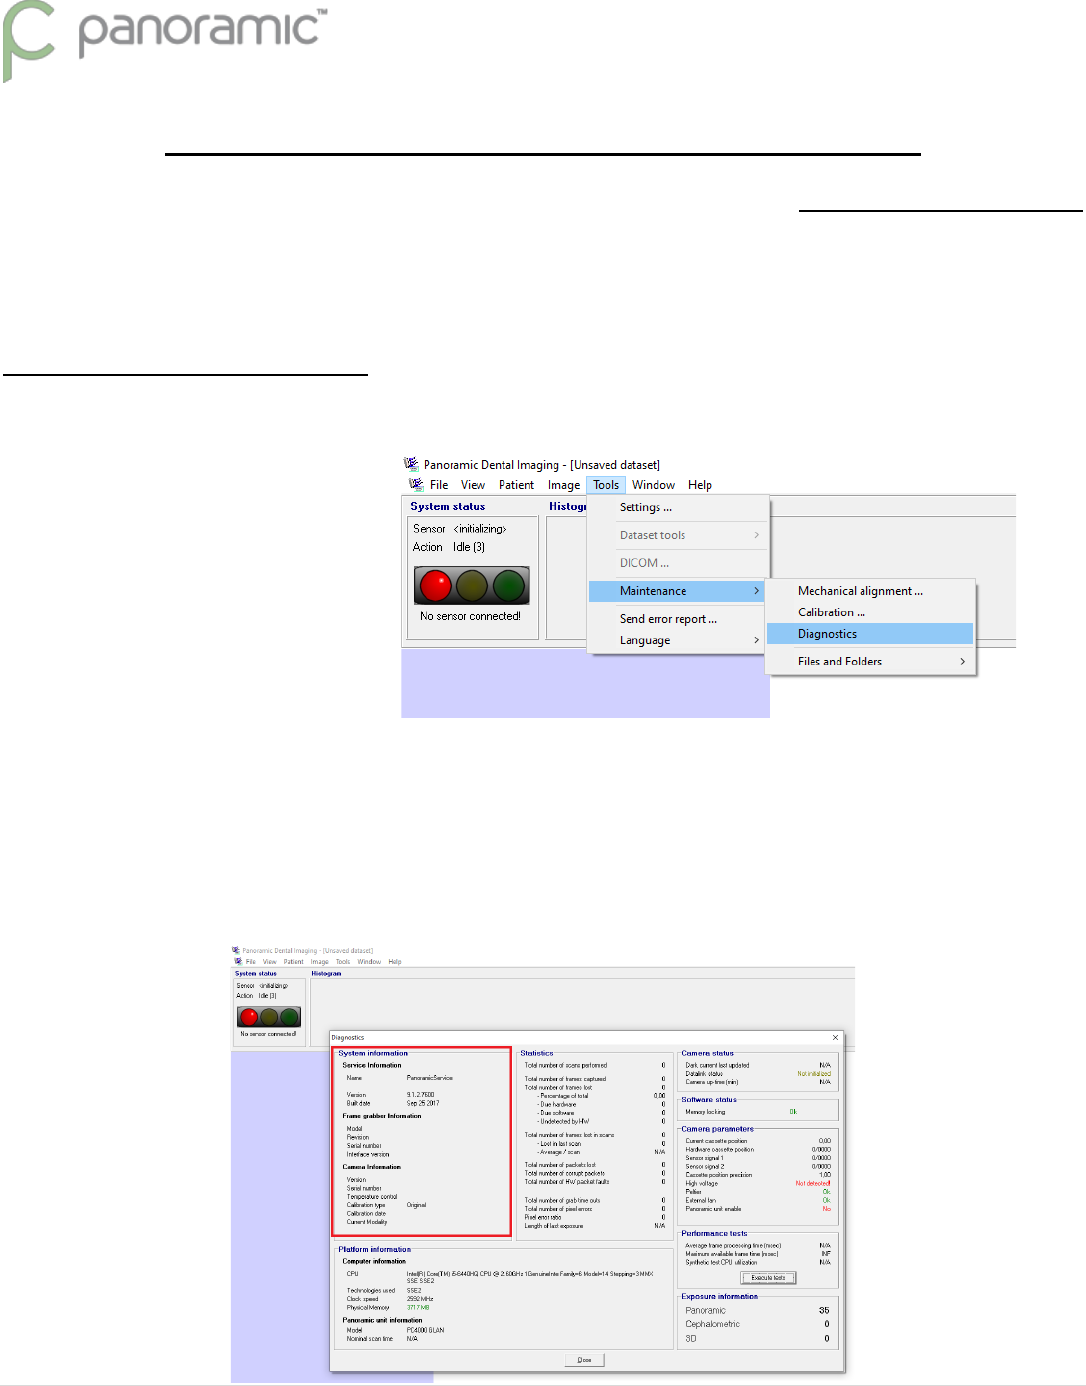
Check the software diagnostics for Frame Grabber Information. Under the Tools menu from the top, choose
Maintenance, and then Diagnostics.
The diagnostics screen shows (below in red) the software version 9.1.2.7600
The Frame grabber Information is blank. This is where the INTEL CT DESKTOP ADAPTER should be listed.
This tells us the software is not connected to the interface card.
To best rule out any software ‘hang-ups’ or ‘freezes’, restart the background service process.
21 | P a g e
RESTARTING THE BACKGROUND SERVICE
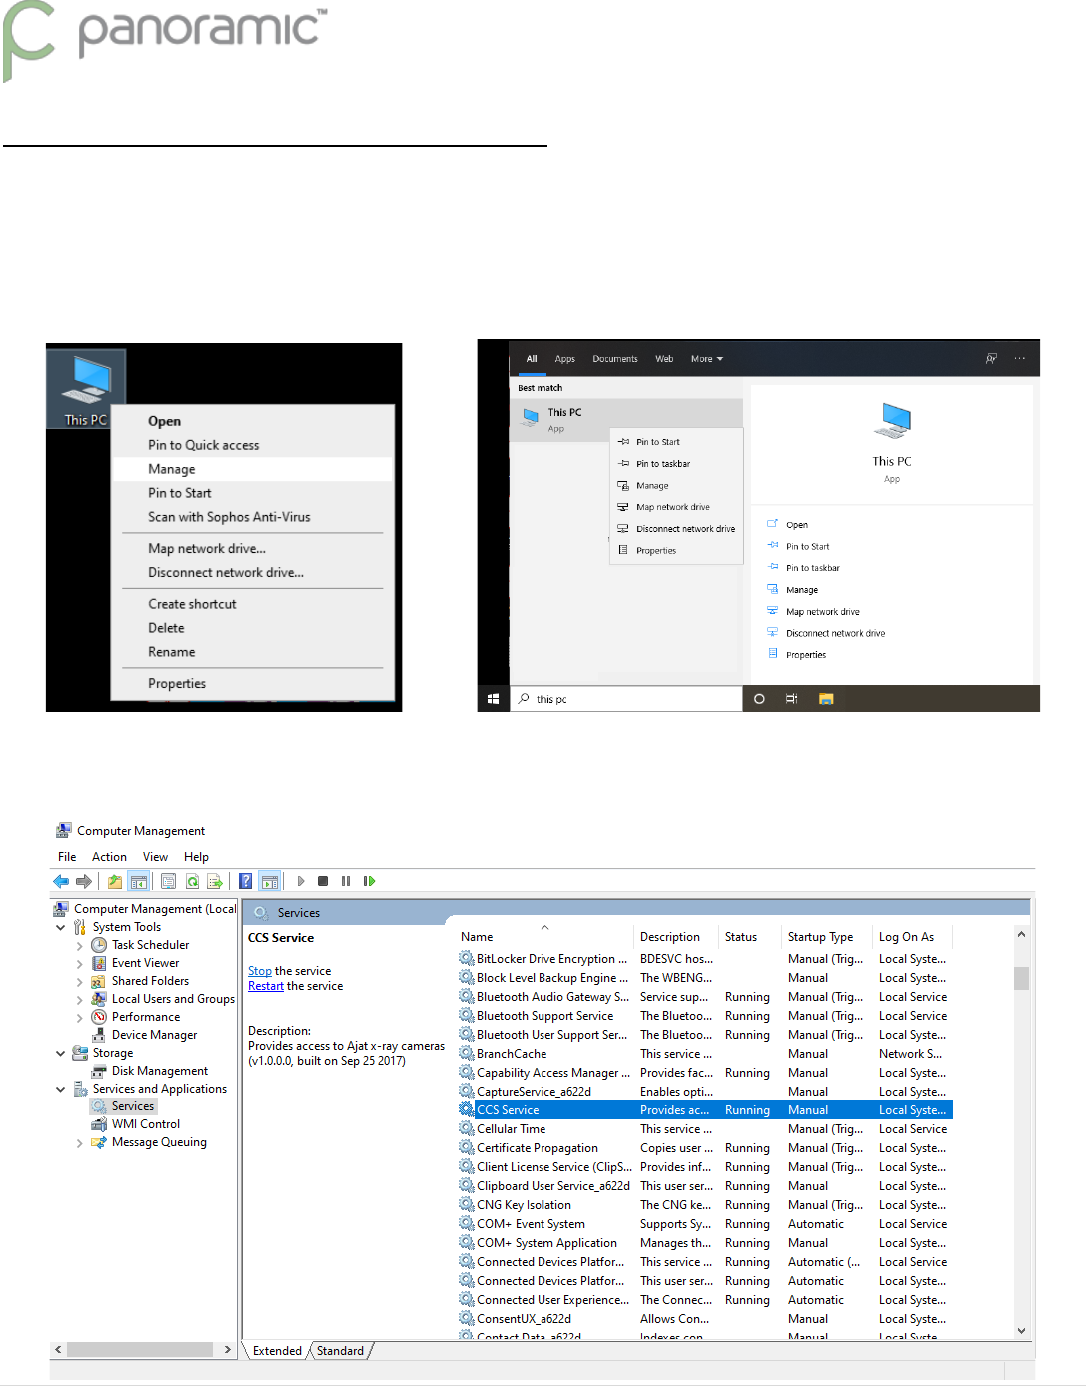
(Important) To restart the background service, first CLOSE the PANORAMIC DENTAL IMAGING Software
Open up the Services list by right-clicking ‘This PC’ on the desktop and choosing Manage. If this icon is not on the
desktop, you can enable this in the control panel/settings > Display/Themes. Or type This PC from the start menu, and
right-click on the best match in the list, and click on Manage
Under the Services and Applications category, expand and then click on Services (left). The list of system processes are
listed on the right. Find ‘CCS Service’ in the list, highlight, and then click on the ‘Restart’ link to the top left.
22 | P a g e
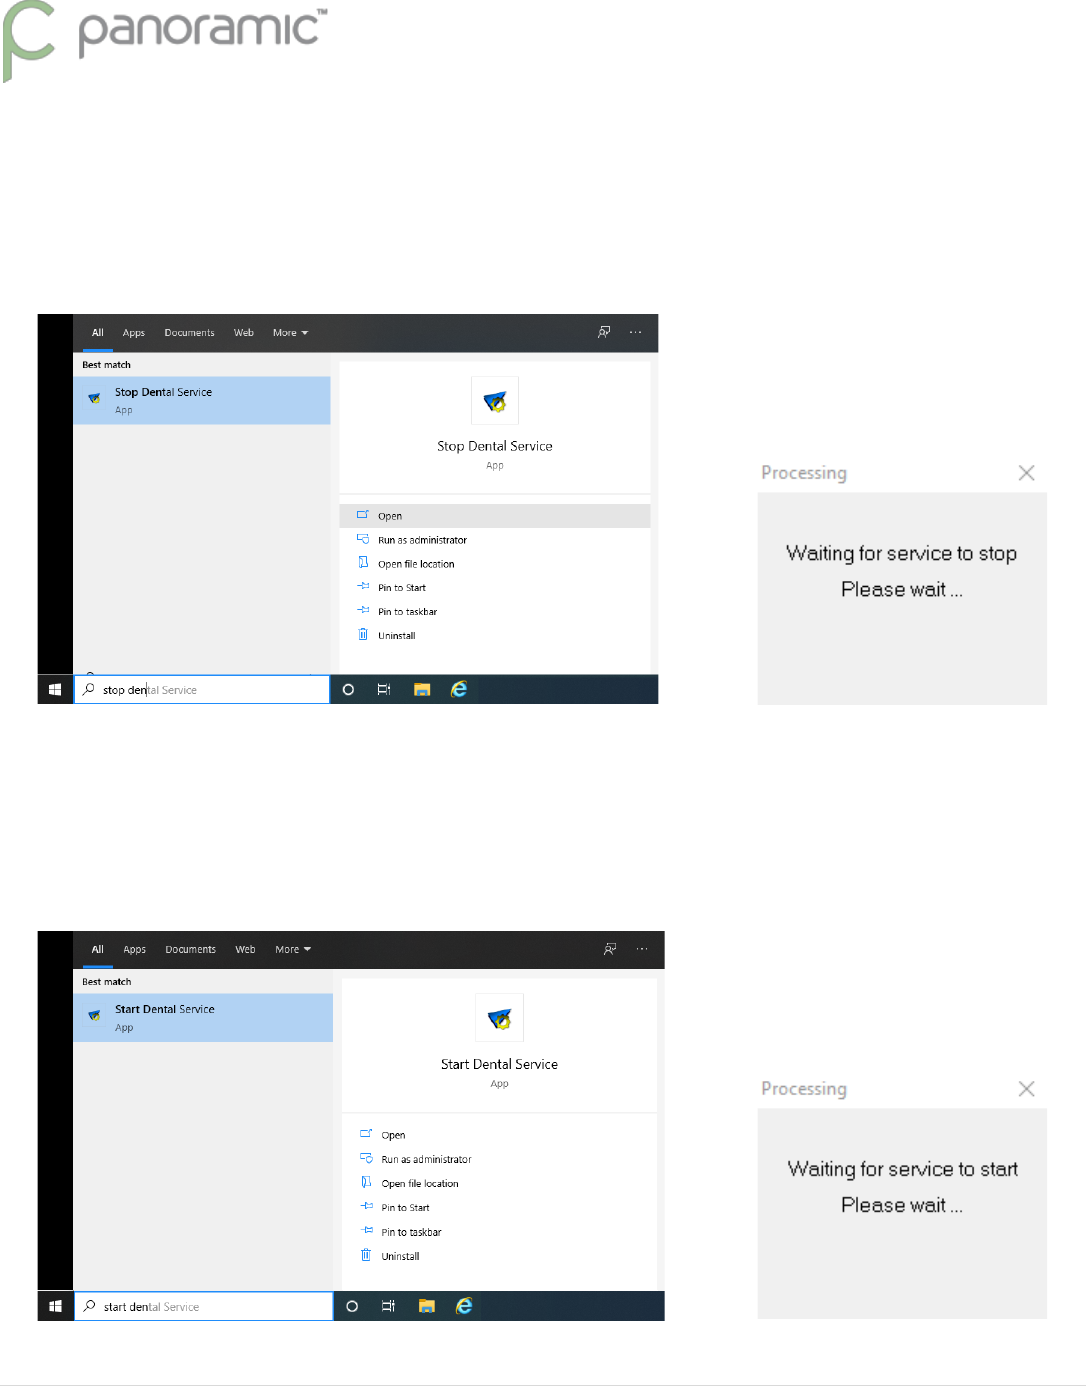
The background service can also be restarted by using the start menu search for “Stop Dental” and “Start Dental”
Open the Stop Dental Service program/command first.
Afterwards you’ll see a small box show a message “waiting for service to stop”
After the small box has disappeared, you can then Open the Start Dental Service program/command.
Again you will see a small box show a message “waiting for service to start”
23 | P a g e
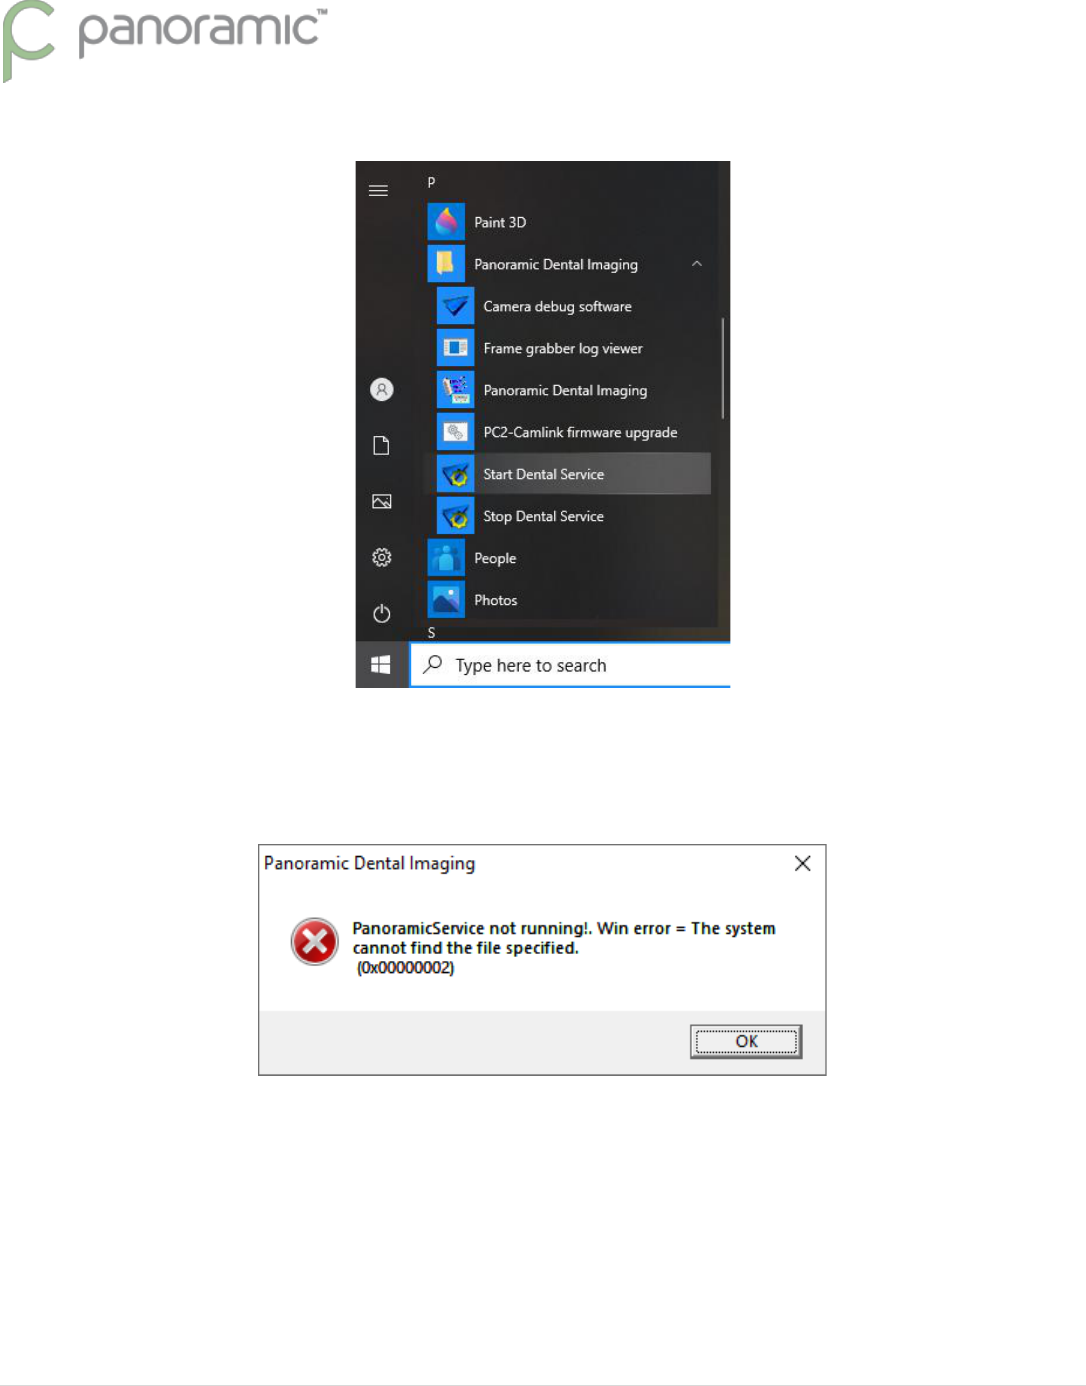
These commands are also listed under the Start Menu > Panoramic Dental Imaging >
Note: If the Panoramic Dental Software is opened when the background service is NOT running, an error message will
appear as below. To correct this, start the background service as described above, and then the program can be opened.
SOLVED? Read the possible reasoning below; otherwise continue to the next steps…
If restarting the background service fixes the connection issue, it would suggest that software is not running the latest
version (and should be updated to v9.1.2.7600), or more likely that the computer was previously put to sleep/hibernate.
This is also shared with the FAST STARTUP option being enabled in the power options of the computer with Windows 10,
turn this feature off. For directions on how to do this refer to the Installation setup guide above, on page 5.
Restarting specifically from a Windows Update can also have this effect. Restarting the computer a 2
nd
time is a more
reliable restart of the Operating System and its resources.

24 | P a g e
Third-Party Interference?
Next evaluate any software-based firewalls. Check the settings of those programs to best assure they are not
monitoring or conflicting with the Pano NIC. Anti-Virus and Firewall software does not know that the interface is
connected directly to an x-ray machine. It merely knows that it is a gateway to the outside. Checking the properties of
the NIC to ensure no added protocols are listed/checked.
Temporarily Disable the software protection to see if the status of the software changes to GREEN.
As an example: Symantec Anti-Virus client protection software will block the pano connection, unless Allow IP Traffic is
enabled within the Firewall options. With this enabled, the connection within the Panoramic software goes GREEN and
the firewall can stay active. Conflicts have also been seen with software-based firewalls like Avast, AVG, Webroot, and
others.
Folders and Directories to exclude from Anti-Virus monitoring are:
C:\ProgramData\Ajat\
C:\Program Files (x86)\Panoramic\
Processes to exclude from Anti-Virus monitoring are:
C:\Program Files (x86)\Panoramic\ccservice.exe
C:\Program Files (x86)\Panoramic\prtestapp.exe
C:\Program Files (x86)\Panoramic\srvtester.exe
25 | P a g e
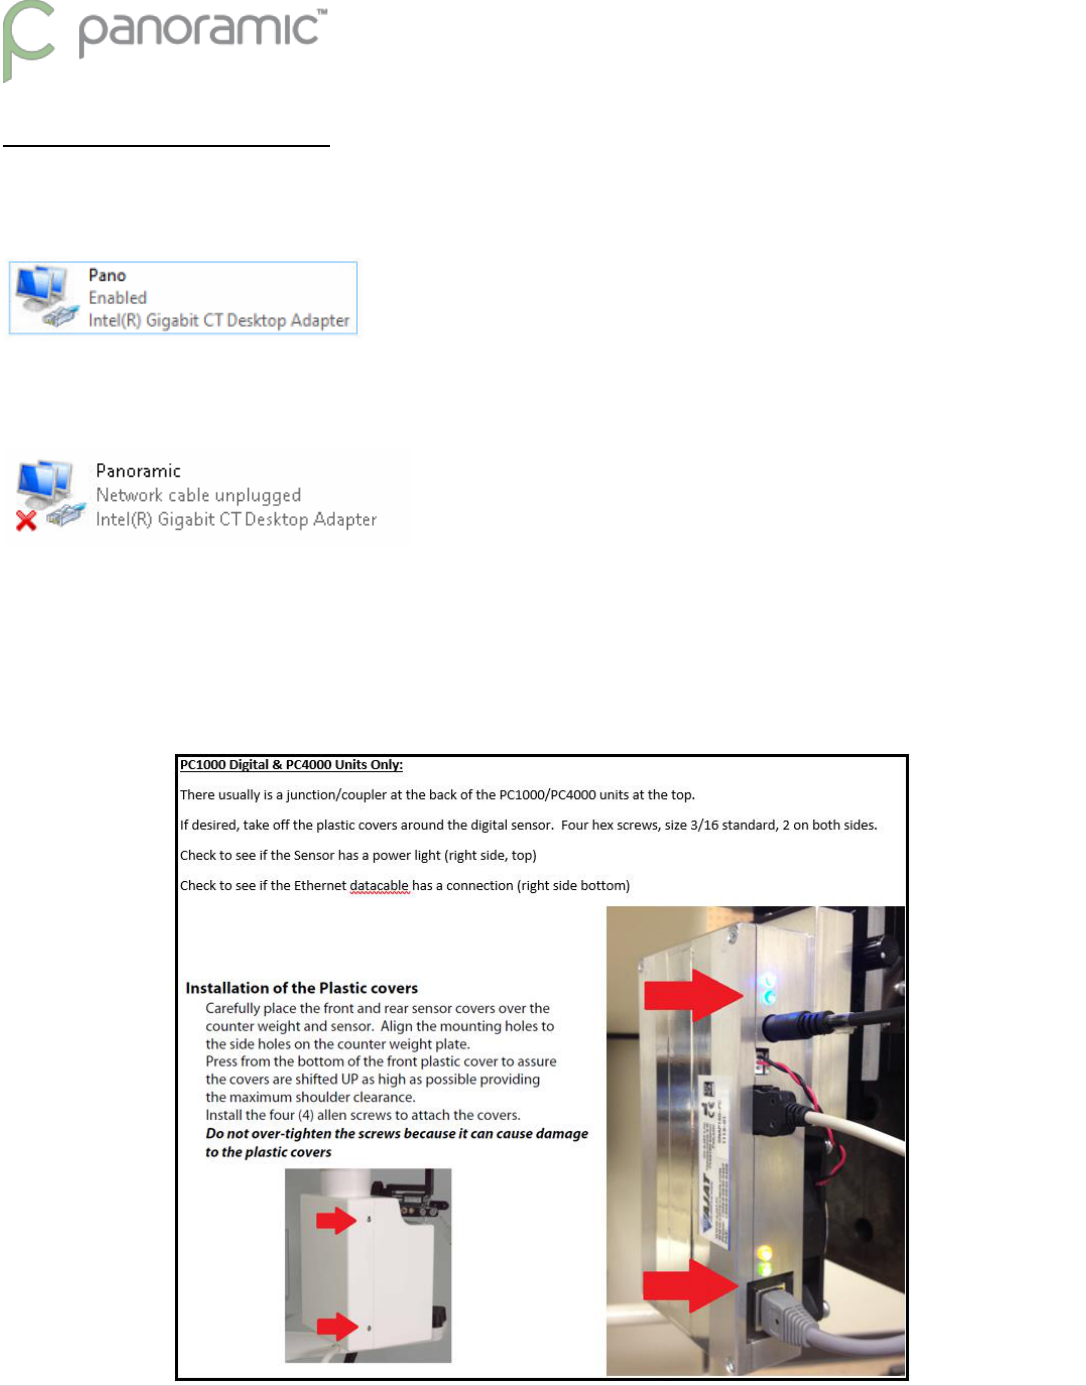
Verify the Interface Card
Within the network connections window (then change adapter options), If the Network Connection icon is
blue/connected, continue the steps from the next page)
If the icon has a Red X indicating a connection issue, it would suggest there is a more physical connection issue or power
issue with the sensor.
If there is a physical connection issue, check to make sure the Ethernet datacable from the Pan machine is connected.
If the connection goes through the wall, try to hook up a replacement Ethernet cable ran outside of the wall to best test
against the first cable/connection for any interference or if the cable is broken. This is more common than you think.
Unplug & replug any junction points between the computer and the Pano machine.
26 | P a g e
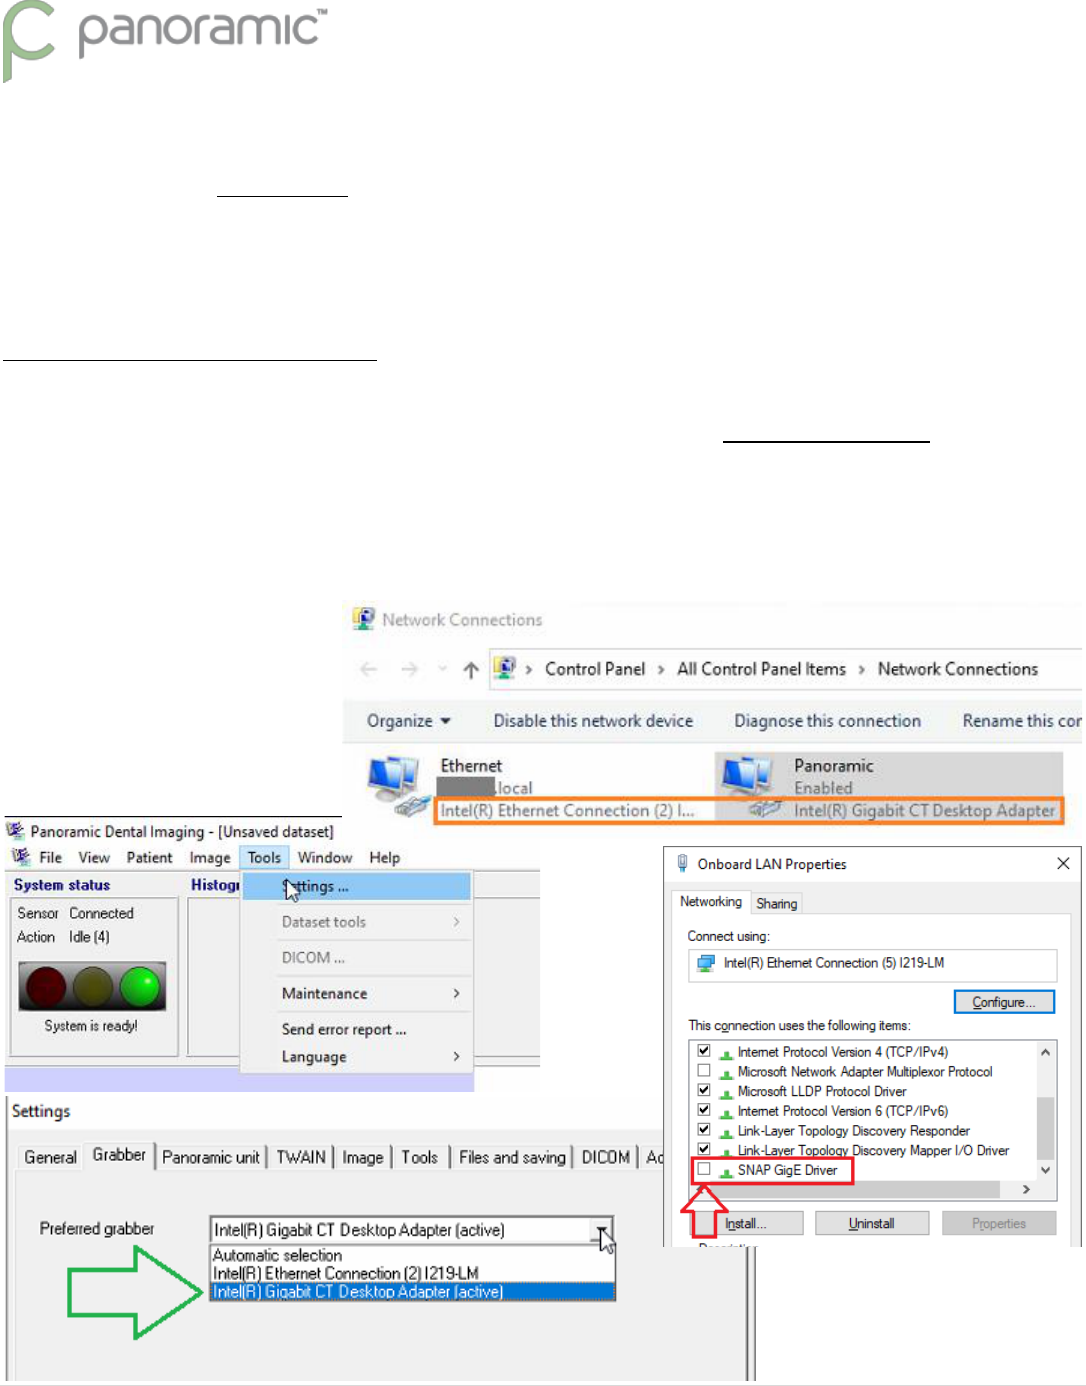
The Panoramic Dental Imaging Software will only connect to an INTEL BRAND interface card. This usually is listed as an
INTEL DESKTOP CT ADAPTER, however the software can interface with any network card under the Intel / Broadcom
umbrella which has the Jumbo Packets feature.
(Important) To avoid software glitches, problems, etc; ensure the Panoramic Software is closed and the background
service is STOPPED when making any changes to the NIC ‘grabber’. After changes have been made, start the service
again to check the software status.
If the computer has two INTEL brand NICs, then ensure the software is pointing/using the correct interface. If the
computer does not have two Intel NICs, then continue onto the next page.
1. With the background service stopped, go to the properties of the NIC that is NOT used for the Pano, and uncheck
the SNAP GigE protocol. Ensure the SNAP GigE protocol is enabled on the Pano NIC. Then start the background
service as described earlier on page 2 (CCS Service)
2. Within the Panoramic Dental Software, under the Tools menu, choose Settings. (screenshots below for reference)
3. Under the Grabber tab, ensure the Correct Intel device is selected. Restart the computer if desired to check the
software status.
27 | P a g e
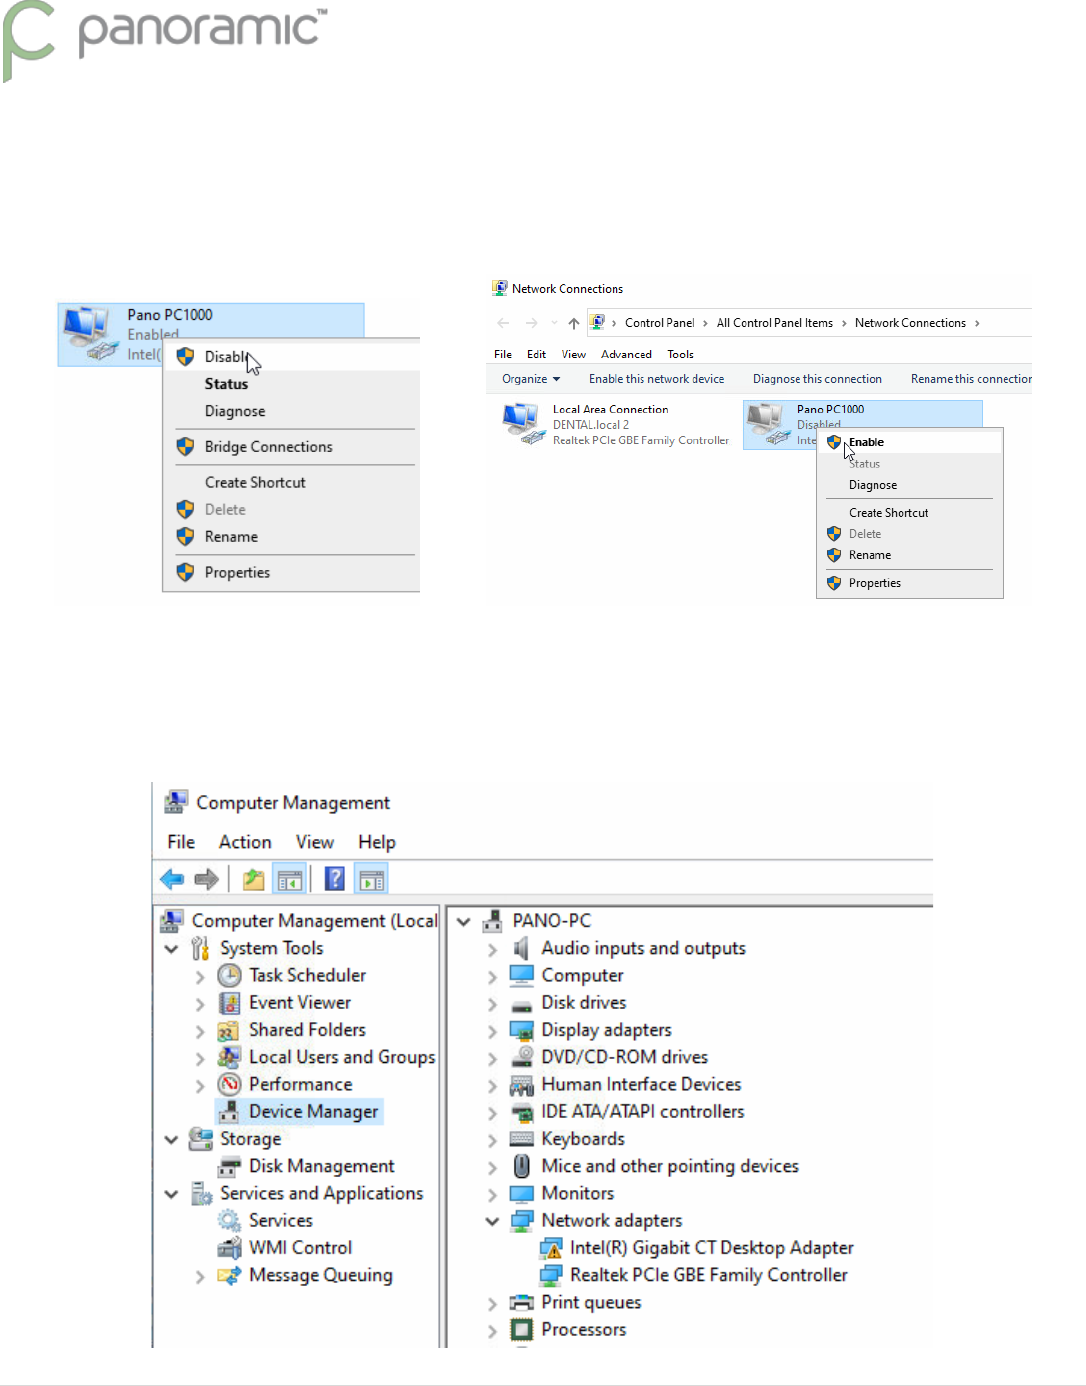
With the background service stopped, check the properties of the Intel NIC to see if they match the installation guide
mentioned above. (pages 7-9)
If no changes were needed, then Disable the NIC and then Enable. This can be done through the right-click shortcut
menu on either network connections or the Computer Management / Device manager window (shown above on pg 2).
After the command to Enable the NIC, check the device manager to see if the NIC is flagged for having a problem.
If the NIC disappears from the Network Connections window, then it should be found flagged in the device manager.
28 | P a g e
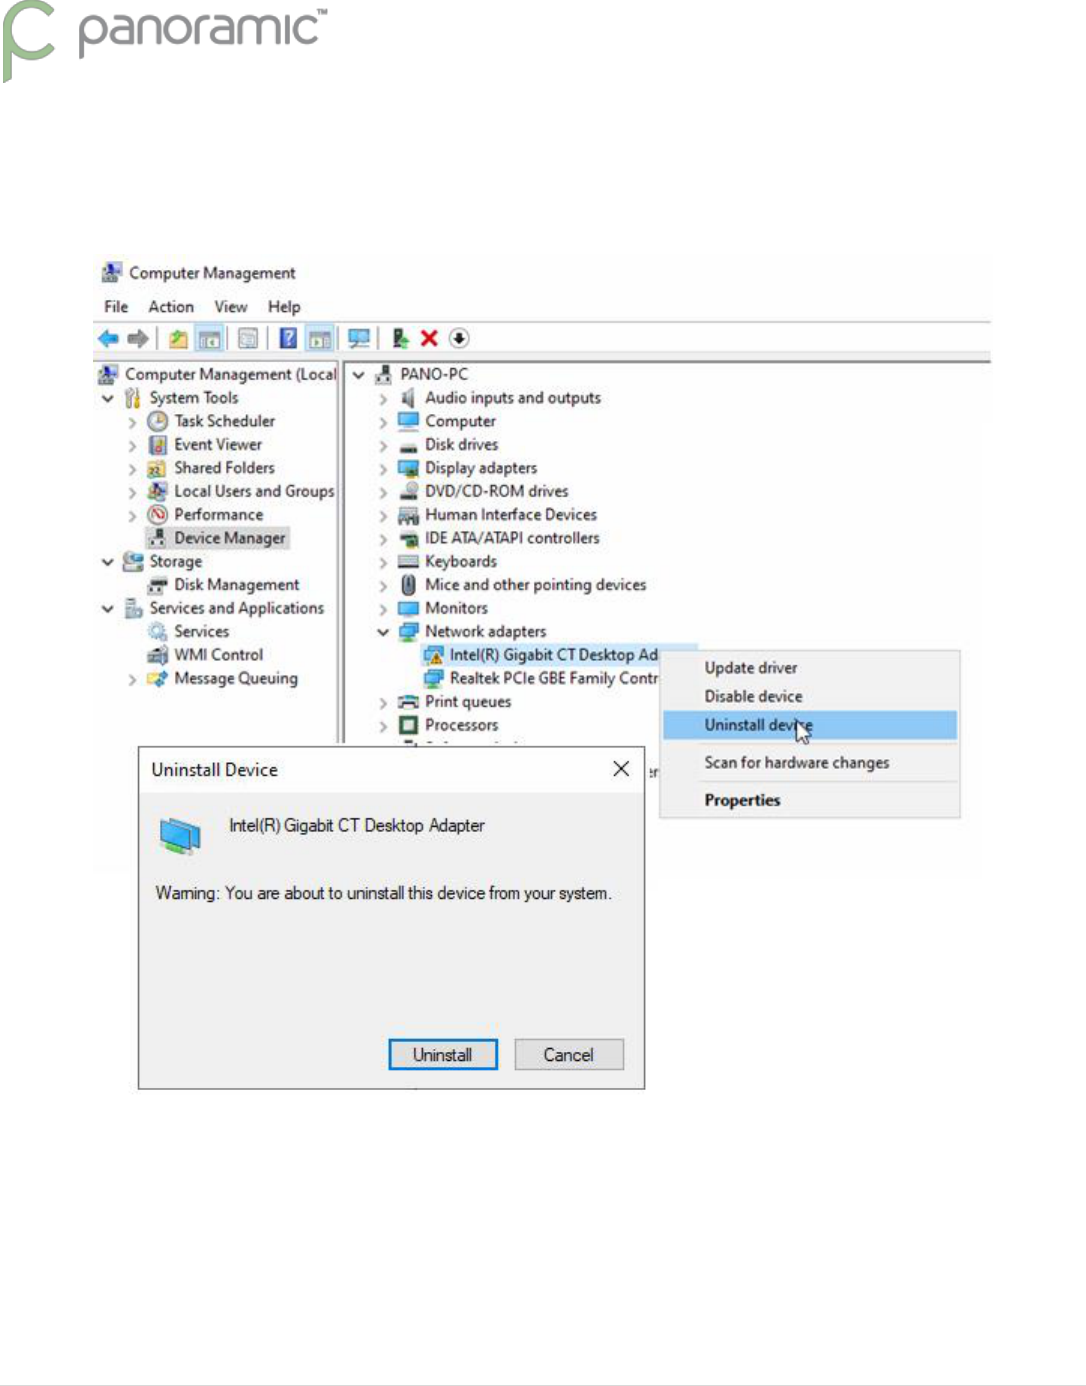
If found flagged, right-click the grabber and Uninstall device. A reboot of the computer is required for the Windows
Operating System to reinstall this device. After a computer reboot stop the background service, and reconfigure the NIC
according to the installation guide above, pages 7-9. Then stop/start the background service and check the software
status.
SOLVED? Read the possible reasoning below; otherwise continue to the next steps…
If the Network Interface Card was flagged by the device manager this can be caused by the card having an internal
problem or Windows tried to make changes to this device that did not work (perhaps from a Windows driver Update).
This flagged status shows an issue from the card with the computer. It has nothing to do with the Digital Pano machine
or Pano software. If this continues, try moving the NIC to a different PCIe position on the inside of the computer, or a
replacement Intel NIC may be needed. Consult an IT person(s) for help on this task. A replacement NIC can be ordered
from Panoramic Corporation.
29 | P a g e
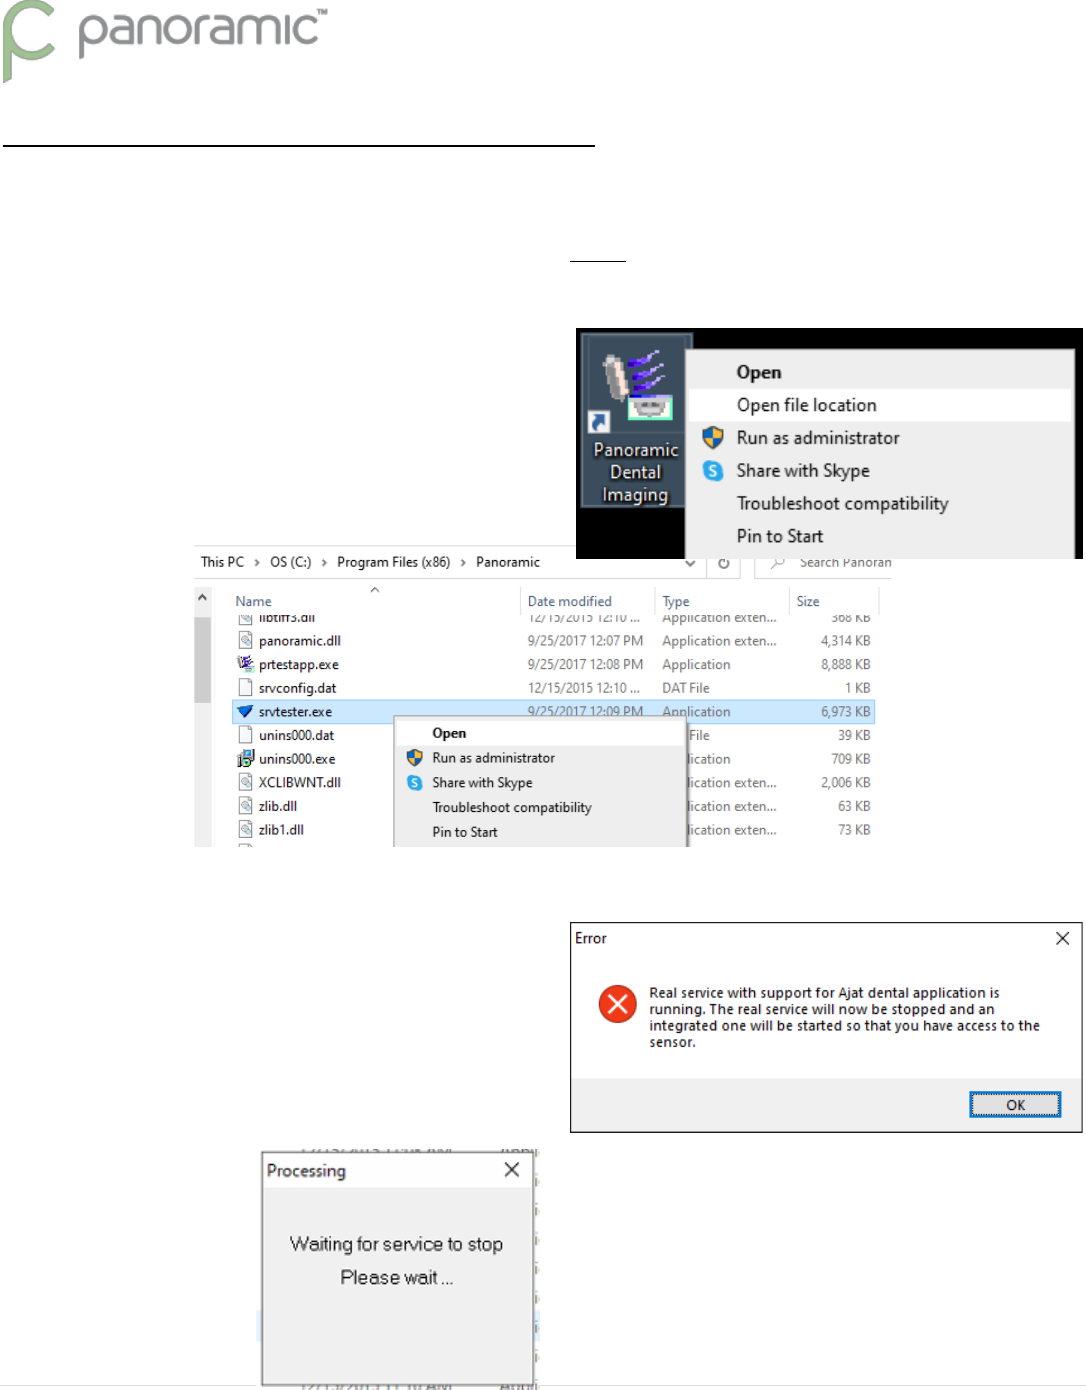
(Uncommon) Using the srvtester Application
Using the srvtester.exe application is quite uncommon. Most connection issues that are software-based are resolved
using the instructions above. Of the very few instances where this tool is needed to correct a connection issue, it is
more used on new computer installation/setups than not. First CLOSE the PANORAMIC DENTAL IMAGING Software.
Then Right-click the desktop icon and choose Open file location.
In the Program directory, beneath this file is another
called srvtester.exe. Right-click this file and choose Open.
An Error message will appear. This is only a warning/information message. It is not truly an error. Click OK.
Be patient as the software will stop/start some
background processes. This takes roughly 5 seconds
depending on computer specifications / performance.
30 | P a g e
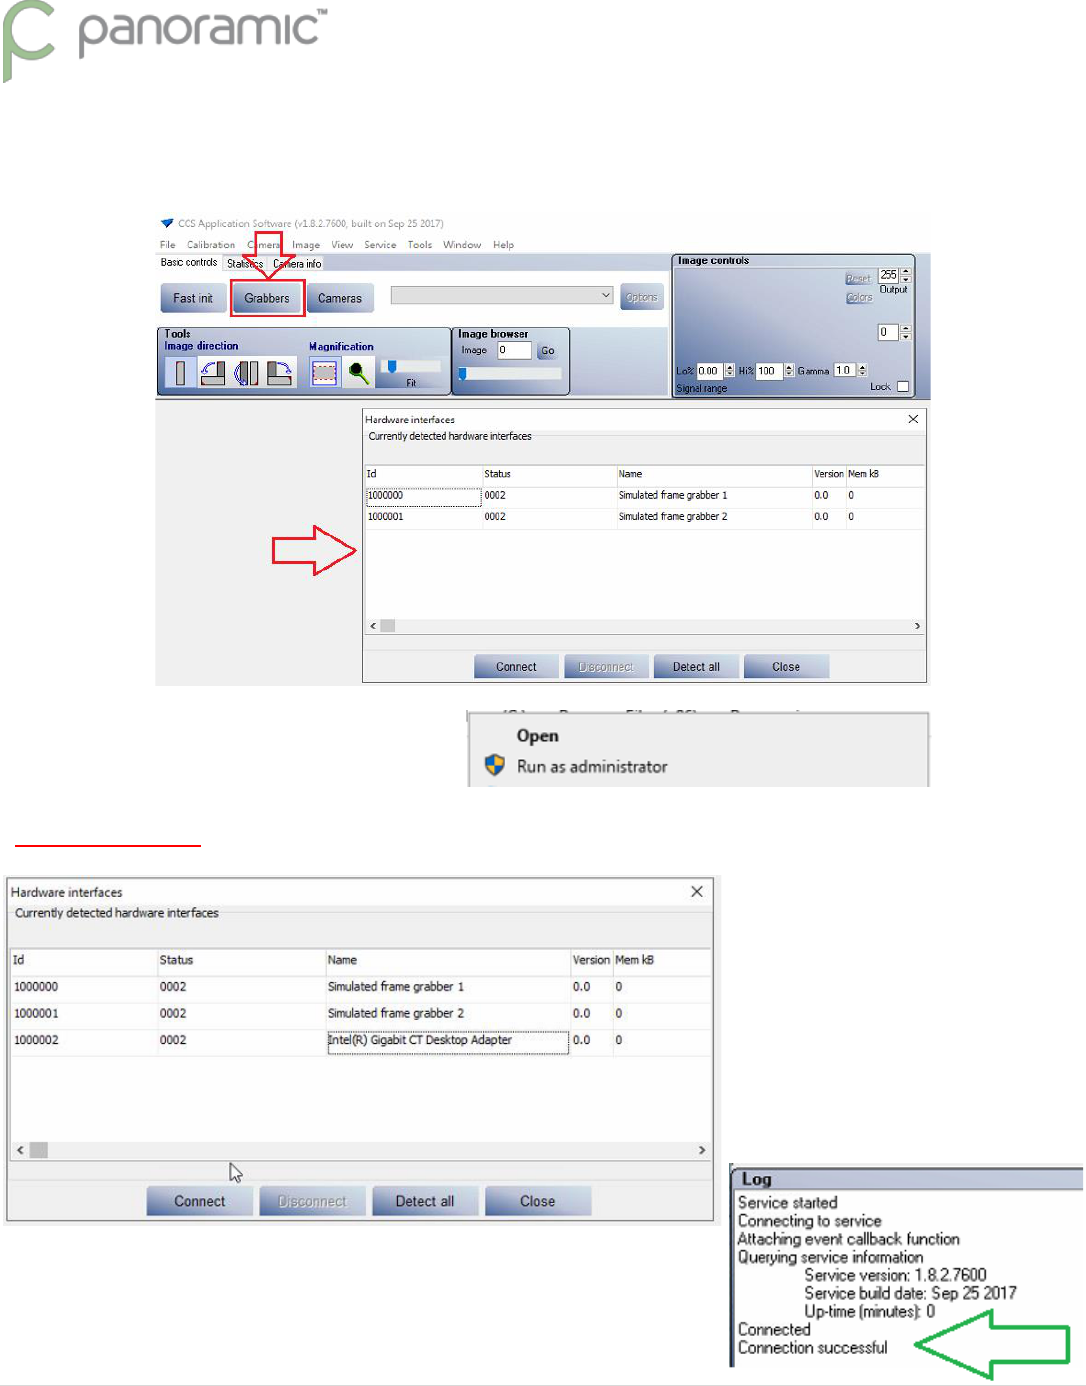
Once the application opens, click the Grabbers button in the TOP LEFT.
Choose the Intel grabber and click Connect.
If the Intel grabber is not listed, then close the
application and re-run with Administrator Rights.
BE PATIENT!!! The software will want to Start/Stop the background process as you exit & reopen the program.
There is a real-time log of the event in the bottom left of the screen showing
a connection was successful. If there are error codes, it would suggest a
problem with the card, or may need to be physically reinserted into the PC.
31 | P a g e
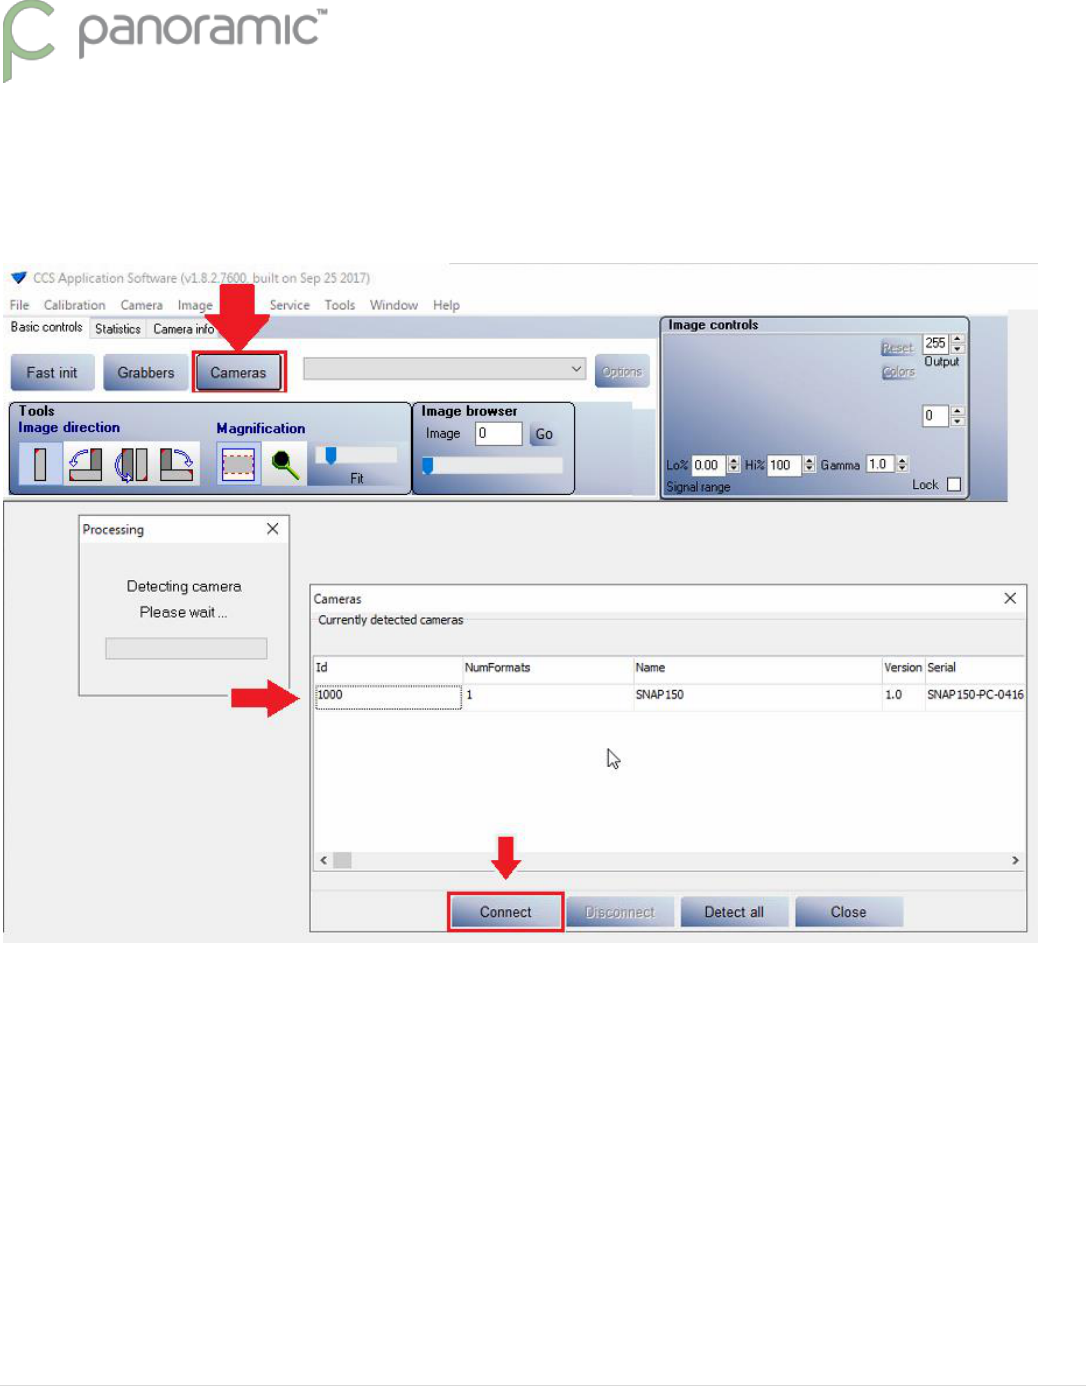
Next click the Cameras button in the TOP LEFT.
The software will take a brief moment to Detect the camera, and then display the list.
Click on the sensor shown, and click the Connect button.
32 | P a g e
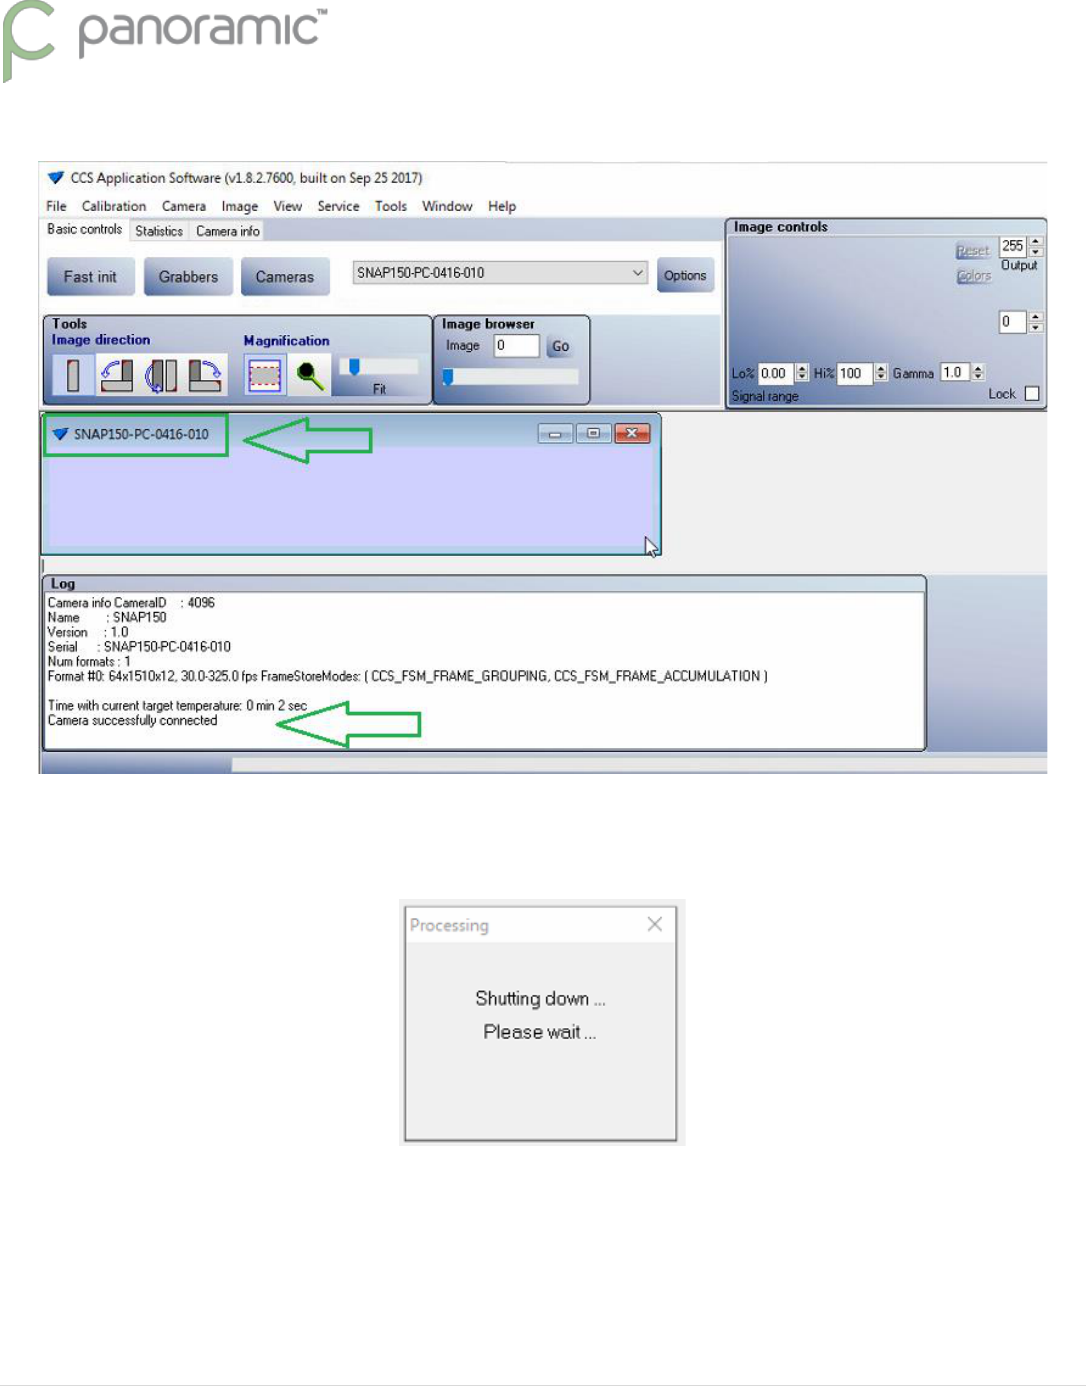
Again the real-time log will show a camera successfully connected.
After a successful connection, close the srvtester application.
The program will stop/start the background process. Please wait.
After the notice disappears, wait 2 seconds and then Open the Panoramic Dental Software from the desktop shortcut.
You should find a GREEN Connection in the top left.

33 | P a g e
If the connection was resolved using the srvtester.exe application, this means that the automatic connection feature
within the program could not detect key functions/settings and needed to be told how to connect. This can occur if there
were complications during the software installation guide, or if the grabber was not in the PC at the time the software
was installed. As uncommon as this is, whenever used, it typically is on a new setup/installation of a computer.
