
FortiMail Cloud Integration with Google
Workspace

2
FORTINET DOCUMENT LIBRARY
https://docs.fortinet.com
FORTINET VIDEO GUIDE
https://video.fortinet.com
FORTINET BLOG
https://blog.fortinet.com
CUSTOMER SERVICE & SUPPORT
https://support.fortinet.com
FORTINET COOKBOOK
https://cookbook.fortinet.com
FORTINET TRAINING SERVICES
https://www.fortinet.com/training
FORTIGUARD CENTER
https://www.fortiguard.com
END USER LICENSE AGREEMENT
https://www.fortinet.com/doc/legal/EULA.pdf
FEEDBACK
Email: techdocs@fortinet.com
August 22, 2023
3
TABLE OF CONTENTS
Change Log ........................................................................................................................................ 4
Introduction ......................................................................................................................................... 5
Configuring Inbound Settings on FortiMail Cloud ............................................................................... 5
Setting Up the DNS Server ............................................................................................................. 6
Configuring Inbound Settings on Google Workspace ......................................................................... 7
Configuring Inbound Connector on Google ..................................................................................... 7
Test Inbound Email Flow after Changing the Public MX Record ..................................................... 9
Configuring Outbound Settings on Google ......................................................................................... 9
Configuring Outbound Routing on Google ...................................................................................... 9
Configuring Outbound Connector on Google Workspace for Internal to Internal Mail (Optional) .. 11
Appendix .......................................................................................................................................... 14

4
Change Log
.Date Change Description
2022-05-16
Initial release.
2023-08-22
Updates.
5
Introduction
This document outlines the basic configuration steps required to integrate FortiMail Cloud with
Google Workspace so that FortiMail Cloud can scan and protect inbound and outbound email to and
from Google Workspace.
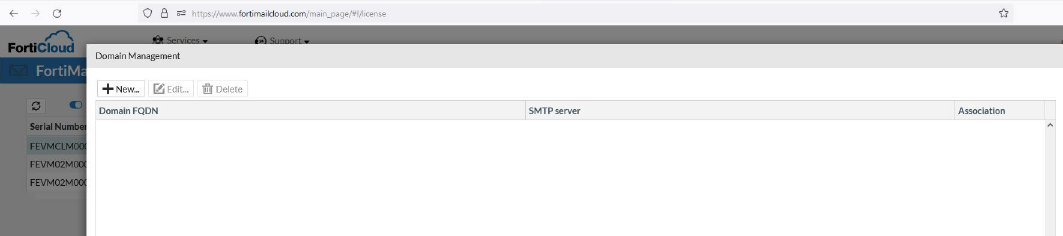
Configuring Inbound Settings on FortiMail Cloud
You will first configure FortiMail Cloud to accept mail to your domain and then forward the mail to
Google Workspace.
1. Go to FortiMail Cloud user portal: https://www.fortimailcloud.com/main_page.
2. Select the FortiMail Cloud instance.
3. Select Action > Manage Domain.
4. Click New, and add the domain by entering the domain name and the SMTP server.

6
Setting Up the DNS Server
Now you must set up the DNS server ensure this new deployed FortiMail Cloud instance works
properly.
o MX Record
In order to route mail traffic from your previous mail server to this new deployed FortiMail Cloud instance,
you need to add below MX record into your DNS zone file.
example.com. 3600 IN MX 10 example-com-1.fortimailcloud.com.
example.com. 3600 IN MX 20 example-com-2.fortimailcloud.com.
Optional: If you would like to add MX for Google server as well, please add below MX record into your
DNS zone file as an extra line.
example.com. 3600 IN MX 30 ASPMX.L.GOOGLE.COM
Please also note that a lower value has a higher priority. Thus, email will be directed to FML Cloud as
higher priority.
o SPF Record
In order to reduce the risk of bounced email from internet, please include below FortiMail Cloud SPF
record into your DNS zone.
If there are SPF records in your DNS zone file, you can add below information into the SPF record:
'include:_spf.fortimailcloud.com'
Otherwise, please create an SPF record as below:
example.com. 3600 IN TXT 'v=spf1 include:_spf.fortimailcloud.com -all'
o DKIM Record
It's recommended to generate your domain's DKIM signature and add it into your DNS zone file. For
details of how to generate DKIM signature and configuration of DKIM signing for outbound email traffic,
please refer to FortiMail Administration Guide.
7
Configuring Inbound Settings on Google Workspace
Now you need to configure Google to accept inbound mail from FortiMail Cloud.
Configuring Inbound Connector on Google
In this section you will create an inbound connector to accept inbound mail from FortiMail Cloud.
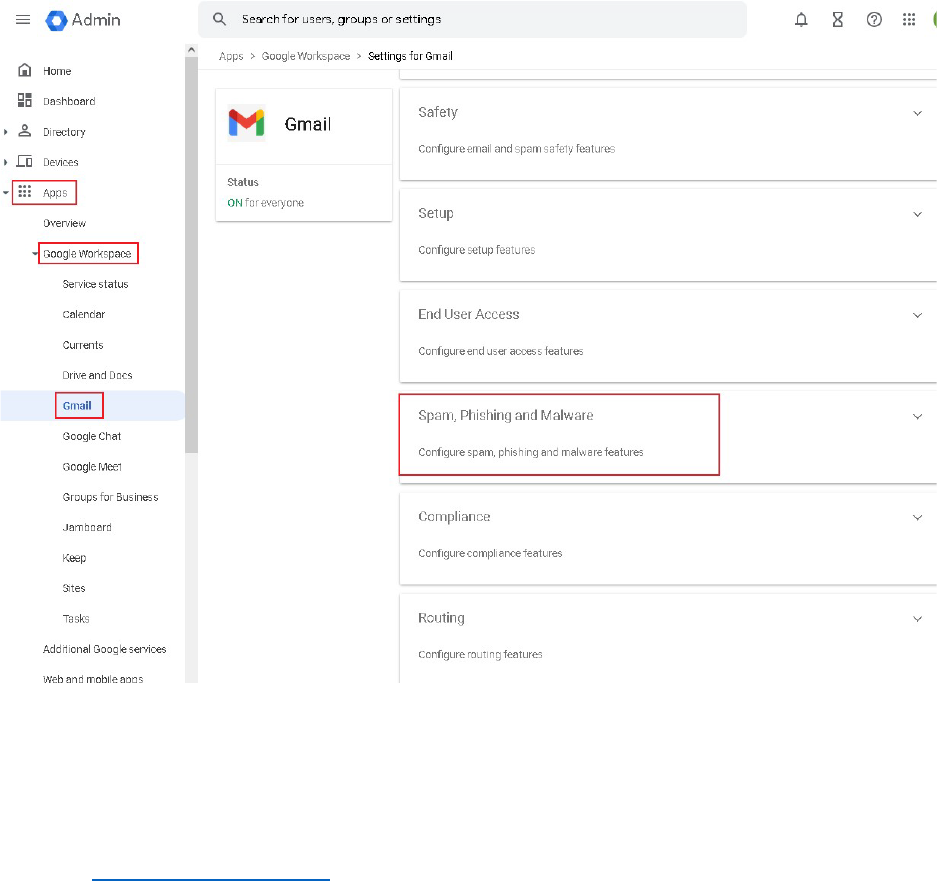
1. Go to Google Admin Console > Apps > Google Workspace > Gmail > Spam, Phishing
and Malware.
2. Enable inbound gateway.
3. Lookup DNS records for you FortiMail Cloud instance.
For example, if the hostname is example-com.fortimailcloud.com, you can either enter the
following information in Linux command line:
dig example-com.fortimailcloud.com +short
Or, go to https://www.nslookup.io/ and find the DNS records for example-
com.fortimailcloud.com.
4. Add both 2 IP addresses to Gateway IPs
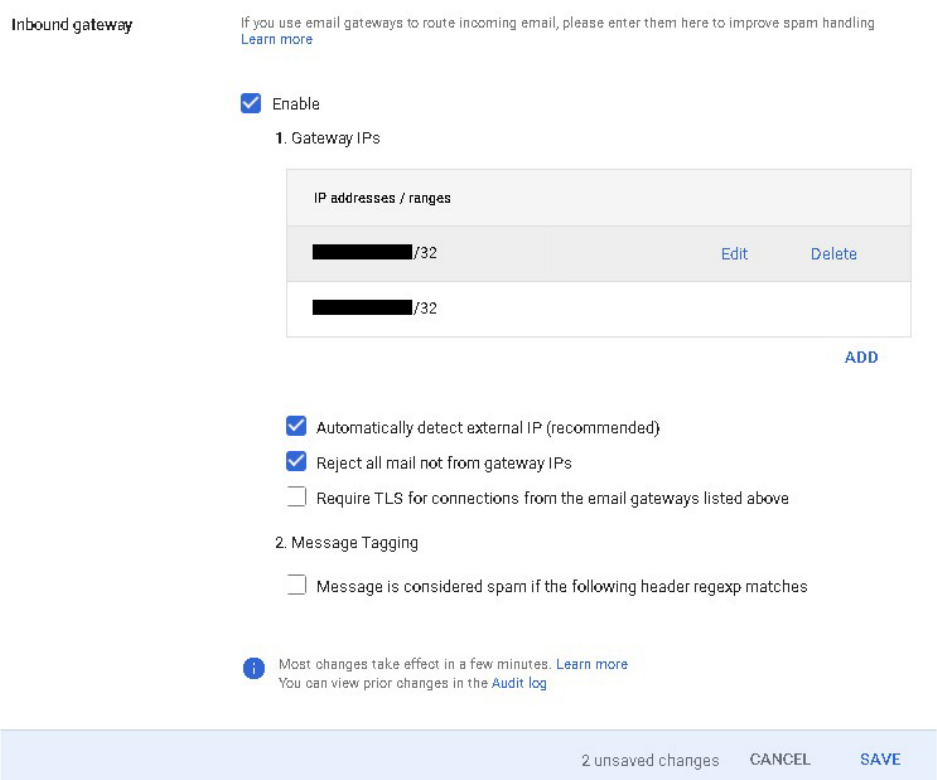
8
5. Select Save.
9
Test Inbound Email Flow after Changing the Public MX Record
o Inbound email to your domain from internet are delivered to the host of the public MX record for your
domain.
o Assuming your current public MX record is example.com. 3600 IN MX 10 mail.example.com. Change it
to
example.com. 3600 IN MX 10 example-com-1.fortimailcloud.com.
example.com. 3600 IN MX 20 example-com-2.fortimailcloud.com.
o Test inbound email using whatever email client software you desire. It is important that you use an email
client software so your PC can correctly resolve the public MX record of your domain.
o Check the mailboxes of the users to confirm the testing was successful.
o If you cannot receive the email, refer to the FortiMail Cloud log to see the reason and modify your
configuration accordingly. The cause might be the relaying email server that is not configured correctly,
in which case you would need to reattempt the initial Configure Inbound Email Relaying section.
Configuring Outbound Settings on Google
Now you need to configure Google to relay outgoing mail to FortiMail Cloud.
Configuring Outbound Routing on Google
Outbound routing are used to redirect outbound mail flow to a specific MTA instead of using the
domain’s configured MX records. Often this type of structure is created to meet a DLP and encryption
requirement or to provide an additional level of antispam/malware inspection of outbound mail flow.
In this section you will create an outbound connector to deliver outbound email through FortiMail
Cloud to provide that extra layer of email inspection.
1. Go to Google Admin Console > Apps > Google Workspace > Gmail > Routing.
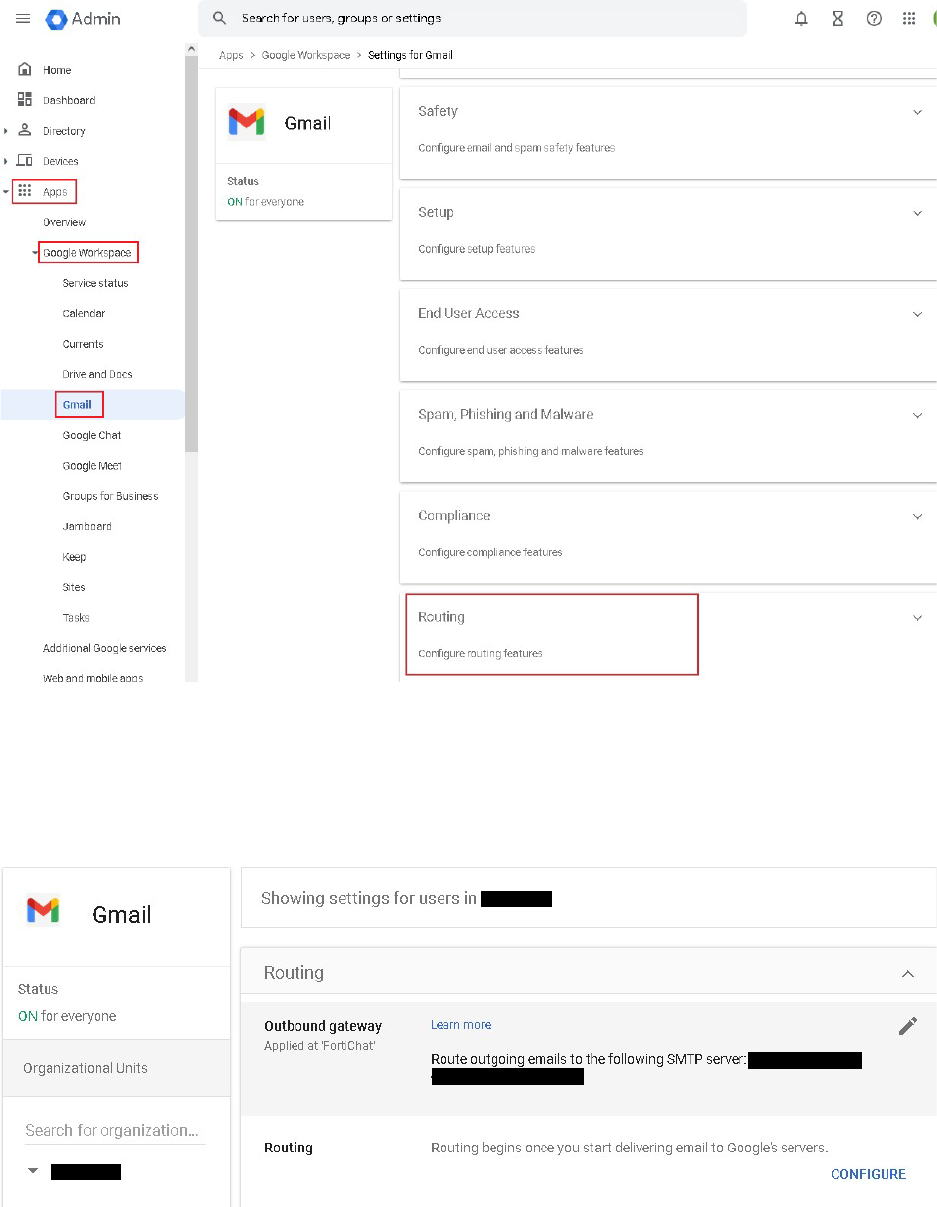
10
2. Select Outbound gateway and Edit
3. Configure the FQDN of FortiMail Cloud as the SMTP server to route outgoing emails
For example, if the hostname is example-com.fortimailcloud.com, enter
example-com.fortimailcloud.com.
4. Select Save.
11
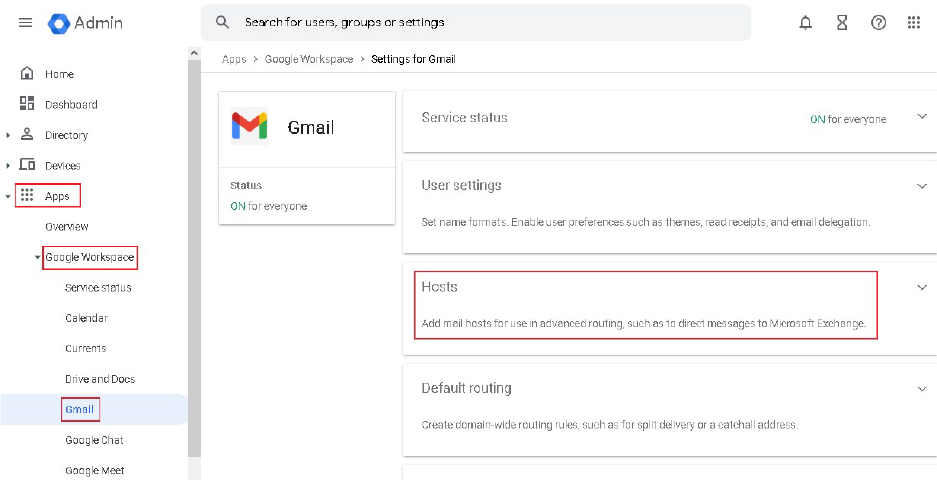
Configuring Outbound Connector on Google Workspace for Internal to Internal Mail
(Optional)
This type of connectors are used to redirect internal to internal mail flow to FortiMail Cloud to provide that
extra layer of email inspection.
1. Go to Google Admin Console > Apps > Google Workspace > Gmail > Hosts.
2. Select Add Route
3. In the popup window of Add mail route,
Enter FortiMail Cloud as name of host
Configure the FQDN of FortiMail Cloud as email server
For example, if the hostname is example-com.fortimailcloud.com, enter
example-com.fortimailcloud.com.
Configure port 25 or 587
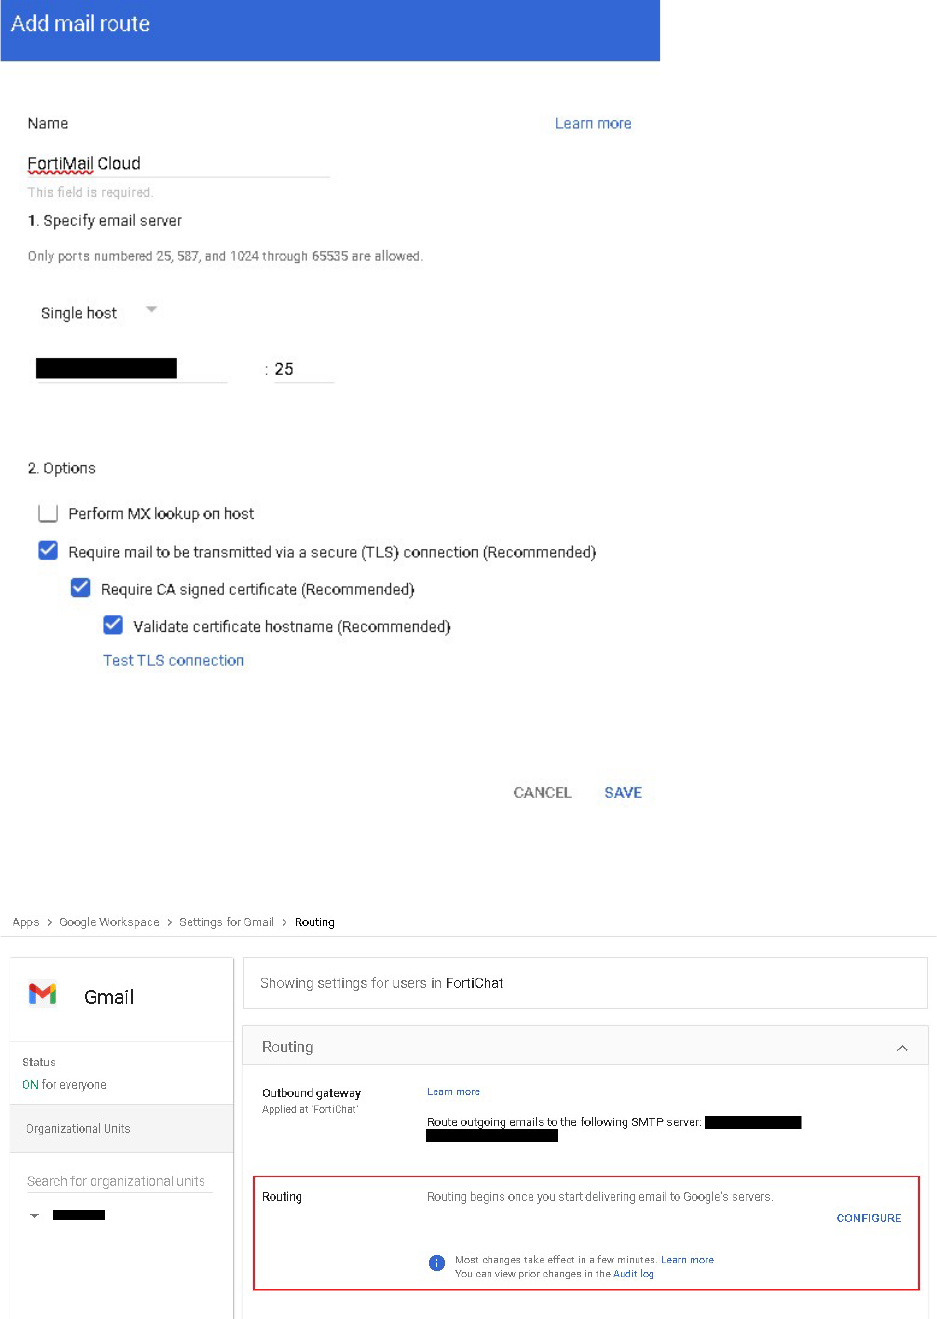
12
4. Select Save.
5. Go to Google Admin Console > Apps > Google Workspace > Gmail > Routing.
6. Configure Routing.
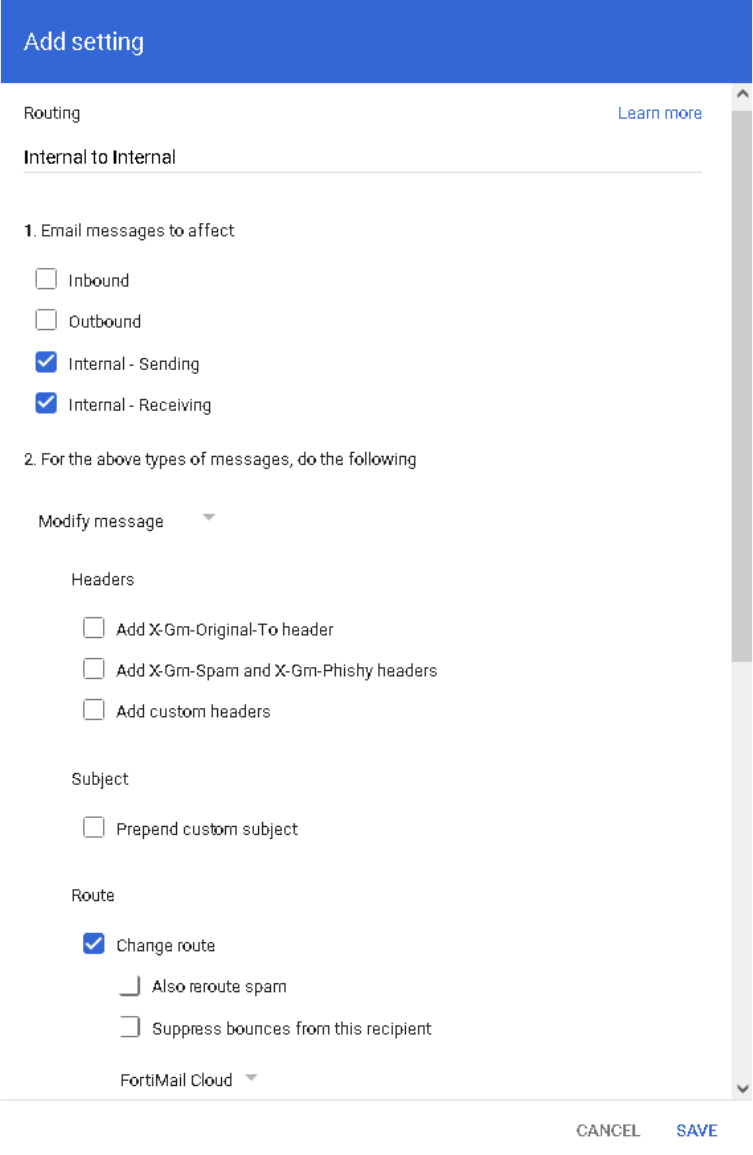
13
7. In the popup window of Add setting,
Enter Internal to Internal as the description
Select Email messages to affect > Internal – Sending & Internal – Receiving
Select For the above types of messages, do the following > Route > Change route > FortiMail
Cloud
14
8. Select Save.
Appendix
FortiMail Cloud IP addresses authorized to send emails
dig +short -t txt _spf.fortimailcloud.com
"v=spf1 ip4:66.35.19.192/26 ip4:99.79.185.184 ip4:204.101.161.204 ip4:154.52.2.128/27
ip4:154.52.3.128/27 ip4:154.52.4.128/27 ip4:154.52.5.128/27 ip4:154.52.14.128/27 " "ip4:154.52.29.128/27
ip4:154.52.16.128/27 ip4:154.52.13.0/25 ip4:3.97.5.75 ip4:209.52.38.228 ip4:154.52.20.191
ip4:154.52.20.193 ip4:154.52.22.128/27 ip4:154.52.23.160/27 -all

Copyright© 2023 Fortinet, Inc. All rights reserved. Fortinet®, FortiGate®, FortiCare® and FortiGuard®, and certain other marks are registered trademarks of Fortinet, Inc., in
t
he
U.S. and other jurisdictions, and other Fortinet names herein may also be registered and/or common law trademarks of Fortinet. All other product or company names may be
trademarks of their respective owners. Performance and other metrics contained herein were attained in i
nternal lab tests under ideal conditions, and actual performance and
other results may vary. Network variables, different network environments and other conditions may affect performance results. Nothing herein represents any binding
commitment by Fortinet, and Fortinet disclaims all warranties, whether express or implied, except to the extent Fortinet enters a binding written contract, signed by Fortinet’s
General Counsel, with a purchaser that expressly warrants tha
t the identified product will perform according to certain expressly-identified performance metrics and, in such
event, only the specific performance metrics expressly identified in such binding written contract shall be binding on Fortinet. For absolute clarity, any such warranty will be
limited to performance in the same ideal conditions as in Fortinet’s internal lab tests. In no event does Fortinet make any commitment related to future deliverables
, features, or
development, and circumstances may change such that any forward-looking statements herein are not accurate. Fortinet disclaims in full any covenants, representations, and
guarantees pursuant hereto, whether express or implied. Fortinet reserves the right to change, modify, transfer, or otherwise revise this publication without notice, and the most
current version of the publication shall be applicable.
