
Email Services Deployment
Administrator Guide
Email Services Deployment Administrator Guide
Documentation version: 1.0
Legal Notice
Copyright 2016 Symantec Corporation. All rights reserved.
Symantec, the Symantec Logo, and the Checkmark Logo are trademarks or registered trademarks of
Symantec Corporation or its affiliates in the U.S. and other countries. Other names may be trademarks
of their respective owners.
The product described in this document is distributed under licenses restricting its use, copying, distribution,
and decompilation/reverse engineering. No part of this document may be reproduced in any form by any
means without prior written authorization of Symantec Corporation and its licensors, if any.
THE DOCUMENTATION IS PROVIDED "AS IS" AND ALL EXPRESS OR IMPLIED CONDITIONS,
REPRESENTATIONS AND WARRANTIES, INCLUDING ANY IMPLIED WARRANTY OF
MERCHANTABILITY, FITNESS FOR A PARTICULAR PURPOSE OR NON-INFRINGEMENT, ARE
DISCLAIMED, EXCEPT TO THE EXTENT THAT SUCH DISCLAIMERS ARE HELD TO BE LEGALLY
INVALID. SYMANTEC CORPORATION SHALL NOT BE LIABLE FOR INCIDENTAL OR CONSEQUENTIAL
DAMAGES IN CONNECTION WITH THE FURNISHING, PERFORMANCE, OR USE OF THIS
DOCUMENTATION. THE INFORMATION CONTAINED IN THIS DOCUMENTATION IS SUBJECT TO
CHANGE WITHOUT NOTICE.
The Licensed Software and Documentation are deemed to be commercial computer software as defined
in FAR 12.212 and subject to restricted rights as defined in FAR Section 52.227-19 "Commercial Computer
Software - Restricted Rights" and DFARS 227.7202, et seq. "Commercial Computer Software and
Commercial Computer Software Documentation," as applicable, and any successor regulations, whether
delivered by Symantec as on premises or hosted services. Any use, modification, reproduction release,
performance, display or disclosure of the Licensed Software and Documentation by the U.S. Government
shall be solely in accordance with the terms of this Agreement.
Symantec Corporation
350 Ellis Street
Mountain View, CA 94043
http://www.symantec.com
Technical support
If you need help on an aspect of the security services that is not covered by the online Help
or administrator guides, contact your IT administrator or Support team. To find your Support
team's contact details in the portal, click Support > Contact us.

Technical support ............................................................................................... 3
Chapter 1 About deploying Email Services ........................................ 5
Deploying Email Services step-by-step ............................................... 5
Configuring the cloud Email Services ................................................. 9
Chapter 2 Configuring your mail setup ............................................. 11
Pre-implementation checks ............................................................ 11
Technical checks .......................................................................... 13
Redirecting inbound email traffic to the Email Services
infrastructure ......................................................................... 13
Important notes on changing MX records .......................................... 15
Restricting your email traffic ............................................................ 16
About configuring outbound email traffic (optional) .............................. 16
Testing outbound mail ................................................................... 17
Cloud security services IP ranges .................................................... 19
Restricting open relay .................................................................... 19
Chapter 3 Configuring MS Exchange ................................................. 21
Configuring Microsoft® Exchange 2007 and 2010 for outbound
mail ..................................................................................... 21
Chapter 4 Configuring your public hosted cloud services ............. 23
Configuring Google Apps Email for inbound mail ................................. 23
Configuring Google Apps Email for outbound mail ............................... 24
Configuring Microsoft® Office 365™ for inbound mail .......................... 24
Configuring Microsoft® Office 365™ for outbound mail ......................... 25
Contents

About deploying Email
Services
This chapter includes the following topics:
■ Deploying Email Services step-by-step
■ Configuring the cloud Email Services
Deploying Email Services step-by-step
You should have received a confirmation email that contains the information that you need to
deploy Email Services for your organization:
■ The default and backup MX record data
■ The default mail route
The following phases are involved in deploying Email Services:
■ Pre-provisioning phase - you have probably already completed these steps.
■ Self-provisioning phase - you provision your account in the portal.
■ Implementation phase - you carry out these steps.
Table 1-1
Pre-provisioning phase
Further informationStep
Complete a provisioning form and send the form
to your account manager.
1.
Attach your signed contract along with the
completed provisioning form.
2.
1
Chapter
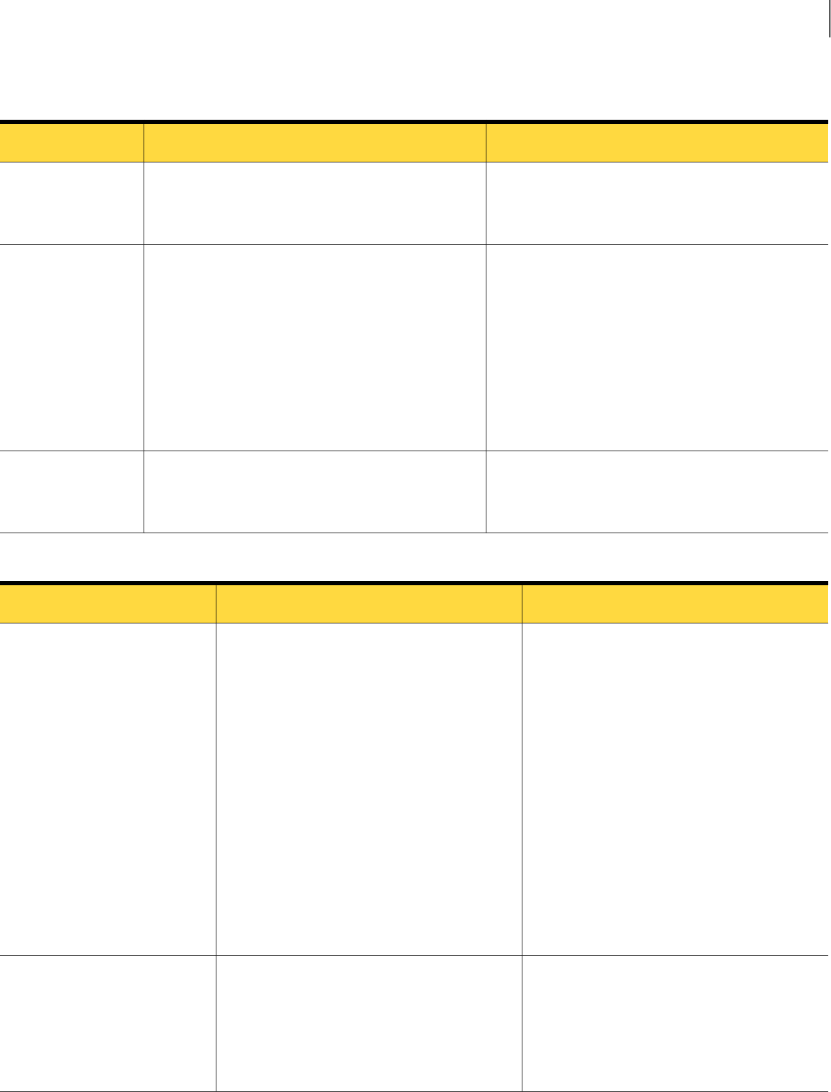
Table 1-2
Self-provisioning phase
Further informationStep
Your account is provisioned on the Email
Services infrastructure and the administration
portal.
1.
We send you a confirmation email that provides
your portal login details. The email also contains
the data and information that you need to
change your MX records and to lock down your
firewall.
Warning: Ensure that this confirmation email
is not detected as spam or junk email. The email
contains important information.
2.
You must connect to the portal using your login
details to configure your organization's technical
information to enable Email Services scanning.
3.
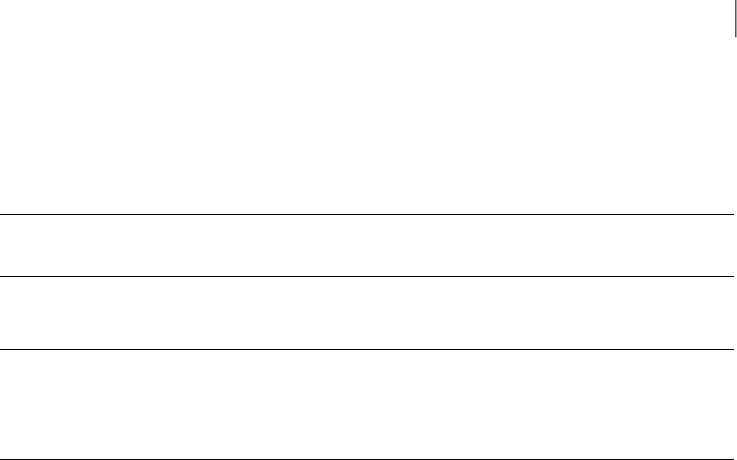
Table 1-3
Implementation phase
Further InformationDescriptionStep
Review, modify, and save your address list
for each of your domains.
In the portal, click Services > Email
Services > Platform.
Your list of valid email addresses ensures
that your organization only receives email
for legitimate users on each domain in your
organization. Email Services does not
deliver any emails that are sent to
addresses on your domain that are not
registered for your organization.
You can manage this list yourself in the
portal or use the Synchronization Tool.
1. Check your address lists
Review your inbound and your outbound
email routes for your domains.
In the portal, click Services > Email
Services > Inbound routes and
Outbound routes.
2. Review your inbound and
your outbound routes for
email traffic
6About deploying Email Services
Deploying Email Services step-by-step

Table 1-3
Implementation phase (continued)
Further InformationDescriptionStep
See “Configuring the cloud Email Services”
on page 9.
When Email Services are fully deployed,
the Anti-Malware and Anti-Spam services
are automatically active and are configured
with default settings. Your inbound email
(and outbound email, if provisioned)
automatically passes through the Email
Services scanners. To customize the
settings for Anti-Malware and Anti-Spam,
make the necessary configuration changes
before you change your MX records.
In the portal, click Services > Email
Services.
3. Check your service
configuration settings
Spam Quarantine enables your
organization's users to view the emails that
the Email Anti-Spam service has detected
as spam. These emails are viewable in a
separate portal called Spam Manager.
If you have Spam Quarantine enabled,
Quarantine the mail is an action in your
Email Anti-Spam Detection Settings page
of the portal.
If Spam Manager is not enabled and you
want it to be, contact:
Global Client Service Initiatives
For Spam Quarantine, you must have
Address Registration enabled and active.
The URL for Spam Manager is provided in
your welcome email. It has the following
format:
https://spammanager-xxx.messagelabs.com/login.xsp
Note: If you are an existing customer
adding a new domain, check your current
Spam Manager URL. Use the same URL
for your new domain.
4. Setting up Spam
Quarantine
7About deploying Email Services
Deploying Email Services step-by-step

Table 1-3
Implementation phase (continued)
Further InformationDescriptionStep
See “Redirecting inbound email traffic to
the Email Services infrastructure”
on page 13.
Complete the following MX record changes
within five working days of receiving your
confirmation email.
It may take up to 24 hours for MX record
changes to result in full propagation.
Make sure that any previous MX records
in place are NOT removed until the change
to Symantec.cloud has fully propagated.
When the records are propagated, ensure
that there are no back-up MX records left
in place.
If an external organization (e.g., your ISP)
manages your MX records, ensure that this
information is passed on to them.
Define the MX records for your domains.
These are provided in you Welcome email.
They use the following format:
■ Lowest MX preference (default mail
route): MX 10
clusterX.XX.messagelabs.com
■ Second MX preference (back-up mail
route): MX 20
clusterX.XX.messagelabs.com
Note: When Email Services are
provisioned and before your MX records
are changed, Symantec.cloud may process
some of your email. Emails that are sent
to your domain(s) by other Email Services
customers who are provisioned on the
same infrastructure as you are processed.
The portal Dashboard and reports may
show that email has been received before
the MX change.
5. Redirect your inbound
email traffic to the Email
Services infrastructure.
See “Configuring Google Apps Email for
inbound mail” on page 23.
See “Configuring Microsoft® Office 365™
for inbound mail” on page 24.
Allow email to come into your organization
only through the Email Services
infrastructure by defining an allow list in
your firewall or your mail server. For public
hosted cloud services, you configure
inbound traffic in the portal.
6. Configure your SMTP
server or public hosted cloud
service for inbound traffic.
8About deploying Email Services
Deploying Email Services step-by-step

Table 1-3
Implementation phase (continued)
Further InformationDescriptionStep
See “About configuring outbound email
traffic (optional)” on page 16.
See “Configuring Google Apps Email for
outbound mail” on page 24.
See “Configuring Microsoft® Office 365™
for outbound mail” on page 25.
Configure your organization’s SMTP server
to have your outbound email scanned. Use
your assigned cluster host name rather
than a single IP to ensure security and
resiliency. The cluster host name is
provided in your Welcome email. It uses
the following format:
■ Relay outbound mail traffic to:
clusterXout.XX.messagelabs.com
■ Relay outbound mail traffic to:
clusterXout.XX.messagelabs.com
Reduce TTL (time to live) and DNS cache
to its lowest possible setting
(recommended 5-15 minutes).
Configure your public hosted cloud service
for outbound traffic in the portal.
6. Redirect your outbound
mail traffic (optional)
Note: We recommend that
you make this redirection the
first of the technical changes
of the implementation
process. You can perform this
step immediately, and it
provides a good test of your
client-side technical changes.
See “Restricting your email traffic”
on page 16.
We recommend that you lock down port
25 SMTP traffic to and from your Internet
gateway to the following IP ranges:
Symantec.cloud IP Ranges
Locking down port 25 prevents spam and
viruses being sent directly to or from your
mail server. It also enables us to balance
traffic across the infrastructure if Internet
conditions require it. For example, during
mass mailer outbreaks, dictionary attacks,
and denial-of-service attacks.
Warning: If you do not accept email from
these IP ranges, there is a risk of partial
email failure.
7. Restrict SMTP traffic
See “Configuring the cloud Email Services” on page 9.
Configuring the cloud Email Services
Once you have deployed your Email Services, your inbound email (and outbound email, if
provisioned) passes through the Email Services infrastructure. The Anti-Malware and Anti-Spam
services are automatically active and are enabled with default settings. The default settings
9About deploying Email Services
Configuring the cloud Email Services
include email disclaimers and email alert notifications. If you do not want to use the default
disclaimer or alert notifications, change the necessary settings in the portal before you change
your MX records. The Image Control and Data Protection services are not active until you
enable them in the Services pages in the portal.
Note: To customize the settings for Anti-Malware and Anti-Spam, make the necessary
configuration changes before you change your MX records.
For further information on Email Services, see Help on cloud security services.
Note: We support public hosted cloud email services from Google Apps and Microsoft® Office
365™. To scan inbound mail on a public hosted cloud service, you must configure an inbound
email route in the portal. If your organization needs to scan your outbound mail from a supported
public hosted cloud service you must also configure an outbound route.
See “Deploying Email Services step-by-step” on page 5.
See “Redirecting inbound email traffic to the Email Services infrastructure” on page 13.
10About deploying Email Services
Configuring the cloud Email Services

Configuring your mail setup
This chapter includes the following topics:
■ Pre-implementation checks
■ Technical checks
■ Redirecting inbound email traffic to the Email Services infrastructure
■ Important notes on changing MX records
■ Restricting your email traffic
■ About configuring outbound email traffic (optional)
■ Testing outbound mail
■ Cloud security services IP ranges
■ Restricting open relay
Pre-implementation checks
Before we complete the setup of Email Services, we perform certain tests. To ensure that your
account is set up as soon as possible, we recommend steps that you can take before you
enter your technical details in the Domains wizard in the portal.
2
Chapter

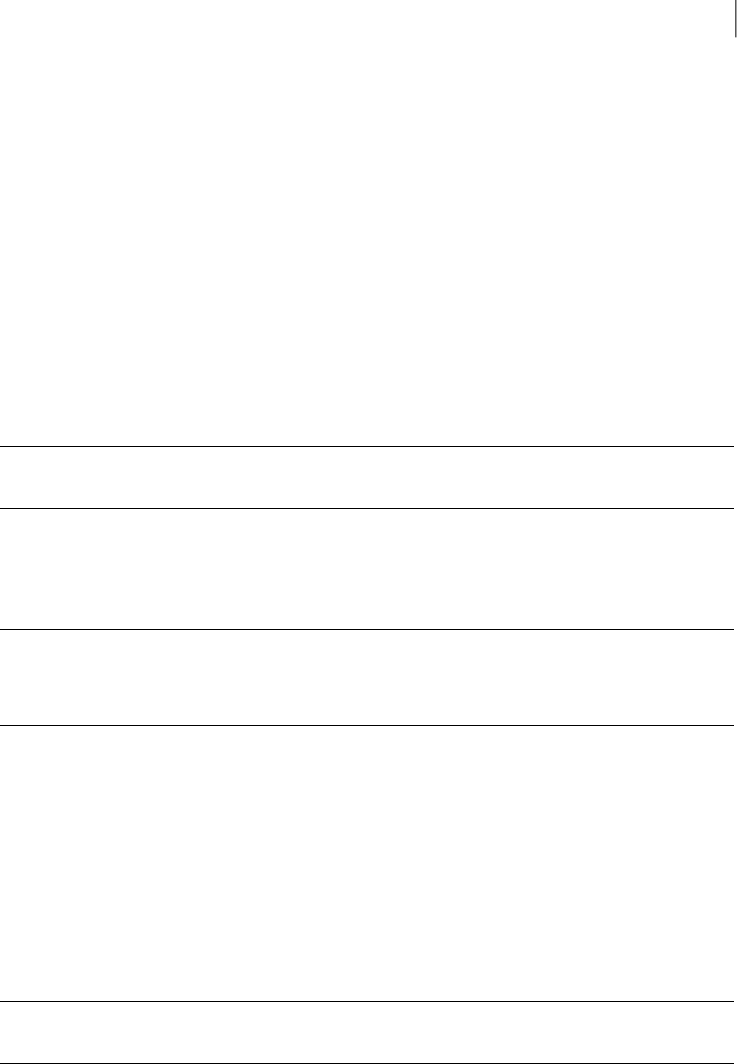
Table 2-1
Pre-implementation checks
PreparationTestCheck
To minimize the chance of this test failing,
ensure that you allow the cloud security
services IP ranges through your security
device, such as your firewall. These IP
ranges vary according to region. They
can be found at: Cloud security services
IP Ranges.
Also, ensure that your mail server is
configured to relay for all domains you
want to use.
The connectivity check is an important
part of the Email Services setup. This
checks that we can successfully deliver
mail to your specified IP address. When
performing this test, we try to deliver a
test email through port 25 to the
postmaster address at the IP address
you have provided.
Connectivity
Ensure that any domains you want to use
are valid and registered. Ideally, they
should have valid MX records present.
The domain check tests that the domains
you want to use with the Email Services
are registered. The Domains wizard
performs a DNS check to ensure that
your domain is registered.
Domain check
Ensure that you have configured your
mail server so that it only accepts email
from local addresses.
The open relay test concerns the IP
addresses you want to send outbound
mail from. An open relay server is an
SMTP server configured for people
outside of your organization to send mail
through. Open relay is commonly
exploited by spammers and therefore
presents a security threat.
Open relay
You can check whether your IP address
has been blacklisted or not with the
following sites:
■ SBL (http://www.spamhaus.org/sbl/)
■ XBL (http://www.spamhaus.org/xbl/)
■ PBL (http://www.spamhaus.org/pbl/)
Note: If your IP address is blacklisted,
you are advised to find out the reasons
why to prevent it happening again.
When you add a new IP address to the
Email Services infrastructure, we test to
ensure that the IP address is not
blacklisted on the Spamhaus Block List,
Exploits Block List, or Policy Block List.
Blacklists
See “Technical checks” on page 13.
12Configuring your mail setup
Pre-implementation checks

Technical checks
The IP addresses, mail hosts, and domain names that you enter in the Domains wizard in the
portal must pass a series of technical checks before your account is activated with Email
Services. If the technical checks all complete successfully, your domains are added to the
Email Services infrastructure.
If a technical check fails, you are asked to make the changes necessary to remedy the issue
so that the services can be activated. The technical checks that are performed depend on the
information provided, but are summarized in the following table.
Table 2-2
Technical checks
■ Checks that the domain is registered with the Domain Name Server (DNS)
■ Checks that the Email Services are not already scanning the domain
Domain checks:
■ Checks that open relay is not allowed
■ Checks that your IP addresses are from valid ranges
■ Checks that your IP addresses are not blacklisted
■ Checks connectivity with the cloud Email Services infrastructure
IP checks:
Warning: You must ensure that your SMTP server does not allow open relay. If it does, your
server can be used as a spam gateway. Most current SMTP servers and firewalls allow the
restriction of SMTP relay by IP address (so you only accept mail from our IP addresses) or by
domain (so you reject email that is destined for domains other than your own).
See “Pre-implementation checks” on page 11.
See “Restricting open relay” on page 19.
Redirecting inbound email traffic to the Email
Services infrastructure
To redirect your inbound email traffic to the Email Services infrastructure, you must change
your MX records. You must change the MX records for your SMTP servers or public hosted
cloud services such as Google Apps Email, or Microsoft® Office 365™.
An MX record is a type of resource record in the Domain Name System (DNS) that defines
how email is routed. MX records point to the servers that should receive email and define their
priority relative to each other. Your MX records need to route your inbound email through the
cloud security services infrastructure, where Email Services scan the emails. The clean emails
continue on to your email recipients.
13Configuring your mail setup
Technical checks
To route your email through the cloud security services infrastructure, your MX records must
change to the values that we give you to ensure that all of your email is scanned. They are
used as pointers to where your emails are delivered.
To route your email through Email Services, change the primary and the secondary MX records
for your domains to the MX records that we provide you with. These are in your confirmation
email from us. Your New Customer confirmation email contains the exact MX information that
you should use.
Caution: Check that the confirmation email is not delivered to your spam folder. This email
contains very important information.
First, identify who hosts your domains; that is, the person or organization that is responsible
for maintaining your organization’s MX records or DNS settings. Your Internet service provider
(ISP) may be responsible for your MX records. Typically, each provider supplies an online
form to make changes. Or you may have to notify them that you require a change to your MX
records.
A typical set of MX records before you modify them to use Email Services may look like the
examples in the following table.
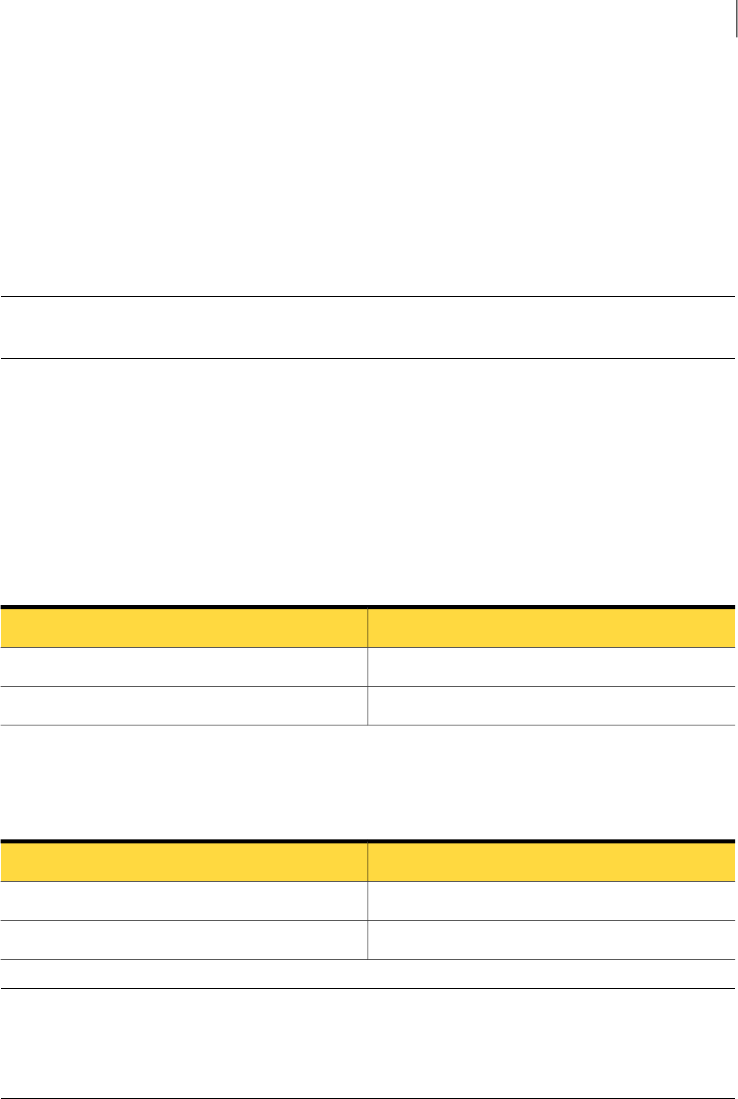
Table 2-3
MX records example
MX recordMail route
MX 10 mailhost.domain.comPrimary (lowest) MX preference (default)
MX 20 relay.isp.comSecond MX preference (back-up)
The new MX record entries that you should use are in the format that is shown in the following
table.
Table 2-4
MX records example
New MX recordMail route
MX 10 clusterx.xx.messagelabs.comPrimary (lowest) MX preference (default mail route)
MX 20 clusterxa.xx.messagelabs.comSecond MX preference (back-up mail route)
Note: As soon as the MX record changes have been made and have propagated, the Email
Services infrastructure starts scanning the emails that your domain receives from external
senders. Ensure that these changes are completed within five working days of receiving the
confirmation email that we send to you. Also ensure that no back-up MX records remain.
14Configuring your mail setup
Redirecting inbound email traffic to the Email Services infrastructure

See “Restricting open relay” on page 19.
Important notes on changing MX records
You must use the MX records specified in your New Customer confirmation email to ensure
Email Services can scan all of the email destined for your domains. The presence of non-Email
Services entries in your MX records, e.g. mailhost.your-domain.com or
isp-relay.your-domain.com is a security risk. Spammers and malicious code distributors often
target back-up MX record entries in an attempt to bypass the Email Services infrastructure. In
this way, spam or other malicious content can be directly delivered to your organization. Your
MX records should never include an entry for your mail server or any type of mail relay.
It can take at least 24 hours for MX record changes to result in full propagation. You are advised
to allow 72 hours for changes to fully propagate. Full propagation means that the cloud Email
Services can scan all email that your domain receives from external sources.
It is possible that the Email Services infrastructure could process some of your email before
you have changed your MX records. This can happen if another cloud Email Services customer
is provisioned on the same cluster as your organization. An email that is sent to one of your
domains by another customer passes through the scanners on its way out from the sending
customer. Email Services can identify that your domains are provisioned on our system and
route those emails through your inbound policies and onto your mail gateways. So, an email
that is sent from another of our clients to you on your cluster means that your service
configurations are applied.
Your organization may experience the following scenarios:
■ Email disclaimers are applied:
See Services > Email Services > Email disclaimers.
■ Your Anti-Spam detection settings filter spam
■ The inbound Data Protection policies that you have defined are applied
■ Your inbound Image Control settings are applied
■ Address Registration is operational:
Your up-to-date address list must be applied. Otherwise, an email that is sent from another
client on your cluster is blocked because it is not found in your address list.
■ Inbound email size restrictions are applied.
See Services > Email Services > Platform.
■ Your dashboard and reports may show that email has been received
■ An email that is sent to you from another Email Services client who is on the same cluster
as you is delivered to your mailhost.
15Configuring your mail setup
Important notes on changing MX records

Caution: If you have asked us to send email to a mailhost that is not yet ready to accept
mail, contact us immediately.
See “Redirecting inbound email traffic to the Email Services infrastructure” on page 13.
See “Restricting open relay” on page 19.
Restricting your email traffic
To ensure that your inbound email does not bypass the Email Services infrastructure, you
must restrict the IP addresses you allow email traffic from to the Cloud security services IP
ranges. Configure your mail gateway to only accept inbound mail from our IP ranges, which
will help to prevent spammers from bypassing the scanning service and sending mail directly
to your server’s IP address. Only port 25 traffic needs to be "locked down" to accept the cloud
security services IP addresses.
Caution: The mail server (or firewall) configuration changes given here should be completed
only after full MX record propagation is complete. Allow 72 hours after changing your MX
records having been changed for full propagation across the Internet.
Depending on your organization’s network configuration, you must define the IP ranges to use
in your mail server, firewall, or public cloud hosted email service, or any combination of these.
The IP ranges that you need to configure in the allow list of your firewall, mail server, or public
cloud hosted email service are listed in the Cloud security services IP ranges PDF.
Note: Due to the diverse range of mail servers and firewalls in use, we cannot provide
instructions or support for the configuration of IP address allow lists in firewalls or mail servers.
Contact your IT department or IT consultant for assistance.
See “Redirecting inbound email traffic to the Email Services infrastructure” on page 13.
See “Configuring Microsoft® Exchange 2007 and 2010 for outbound mail” on page 21.
See “Configuring Google Apps Email for inbound mail” on page 23.
About configuring outbound email traffic (optional)
All Email Services customers are set up with inbound mail scanning, and most also use Email
Services for outbound scanning. Outbound scanning is included with your service at no
additional charge, but using this feature is optional.
16Configuring your mail setup
Restricting your email traffic

We advise that you send your outbound email through the Email Services infrastructure to
ensure that no malware is sent out from your network. You can then be assured that we scan
any email that is sent or received by your organization. One email threat is the exploitation of
domains to spoof email to appear as if it is sent from your organization. Outbound scanning
also helps enforce email policies if you use the Image Control and Data Protection services.
To have your outbound email scanned, you configure your organization's SMTP server or your
public hosted cloud email service to send email through the cloud security services
infrastructure. To do so, you define the IP ranges for outbound email traffic in your mail server,
depending on your mail server configuration. This involves creating a mail route, for example
in the following format:
clusterxout.xx.messagelabs.com
Refer to your New Customer confirmation email for the exact outbound mailhost information
to use.
Note: Due to the diverse range of mail servers in use, we cannot provide instructions or support
for the configuration of IP addresses in mail servers. Contact your IT department or IT consultant
for assistance. However, basic instructions are provided for Microsoft Exchange 2007 and
2010, and for the public hosted cloud services we support.
See “Configuring Microsoft® Exchange 2007 and 2010 for outbound mail” on page 21.
See “Configuring Google Apps Email for outbound mail” on page 24.
Testing outbound mail
You can "spoof" the sending of an email using telnet to test that it is correctly routed through
the Email Services infrastructure.
17Configuring your mail setup
Testing outbound mail

To test outbound mail
1
Type the following command using the outbound mail route provided:
telnet clusterxout.xx.messagelabs.com 25
If the connection is accepted, the remote server responds:
Trying 195.245.230.67... (remote server IP)
Connected to clusterx.xx.messagelabs.com.
Escape character is '^'’.
220 server-4.tower-50.messagelabs.com ESMTP
2
Type a valid helo command (helo and a word of more than five characters):
helo mail.customer.com
The remote server responds that the SMTP conversation has started:
250 server-4.tower-50.messagelabs.com
3
Type in a valid email address at your domain:
mail from: [email protected]
The remote server responds:
250 OK
4
Type an external email address here:
rcpt to: [email protected]
250 OK
5
Then type:
data
This instruction tells the remote server that data is due to be received. The remote server
responds:
354 go ahead
18Configuring your mail setup
Testing outbound mail

6
Type the subject and body of the email. Email Services must have an email with a body
or it gives a 550 error:
subject: testing testing testing
To finish, enter:
. ↵ . ↵ (period, return, period, return)
The remote server responds:
250 ok 1176493466 qp 7506 server-4.tower-
50.messagelabs.com!1176493400!6015990!1
This 250 OK message means that an email has been successfully transferred from the
sending mail server to the recipient mail server.
7
Type the quit command to close the connection:
quit
The remote server responds:
221 server-4.tower-50.messagelabs.com
Connection closed by foreign host.
See “About configuring outbound email traffic (optional)” on page 16.
Cloud security services IP ranges
We recommend that you lock down the traffic to and from your Internet gateway to the IP
ranges for your region. The IP address ranges are available from the following link:
Cloud security services IP ranges
If you are unsure of the region to select, refer to the Welcome email you received with your
portal account details. Whenever you make temporary or permanent network configuration
changes involving IP restrictions, refer to the latest version of this document. The IP address
information is updated regularly.
See “Restricting your email traffic” on page 16.
See “Configuring Microsoft® Exchange 2007 and 2010 for outbound mail” on page 21.
Restricting open relay
For historical reasons, many SMTP mail servers accept email for domains other than their
own and forward it on to the intended recipient. Third-party relay, also known as open relay
19Configuring your mail setup
Cloud security services IP ranges

or insecure relay, is when a mail server routes email for anybody in the world. An open relay
is any computer that accepts email for any domain and forwards it regardless of who the sender
is or what IP address the email is sent from.
Spammers hunt for and abuse these servers to try and cover their tracks. When spammers
locate such a computer they can use it as a free distribution service for their junk email. This
process often leads to the customer's IP address or domain being blacklisted. There is even
a risk that the Email Services infrastructure can be blacklisted, considering the sheer volume
of mail that is processed.
You must ensure that your SMTP server does not allow open relay. If it does allow open relay,
your server can be used as a spam gateway. Most current SMTP servers and firewalls allow
the restriction of SMTP relay in the following ways:
■ By IP address - so that you only accept mail from the Email Services IP address ranges
■ By domain - so that you reject mail that is destined for domains other than your own
20Configuring your mail setup
Restricting open relay

Configuring MS Exchange
This chapter includes the following topics:
■ Configuring Microsoft® Exchange 2007 and 2010 for outbound mail
Configuring Microsoft® Exchange 2007 and 2010 for
outbound mail
Send Connectors allow Exchange Server to route all outbound email through another SMTP
server.
To configure a send connector
1
Open the Exchange Management Console and click Organization Configuration >
Hub Transport > Send Connectors.
2
Right-click in the list in the center pane and select New Send Connector.
3
In the wizard, type a name for the connector and from the Select the intended use for
this Send Connector drop-down list, select Custom. Click Next.
4
In the Address Space page, click Add. Enter * as the domain, and check Include all
subdomains.
5
Click OK, then click Next.
6
In the Network settings page, select the Route mail through the following smart hosts
button, and click Add.
7
In the Add smart host page, select Fully qualified domain name (FQDN), and enter
your assigned cluster host name for outbound email traffic. Your cluster host name is
provided in your Welcome email. The cluster host name is in the following format:
clusterxout.xx.messagelabs.com
8
Click OK, then click Next.
9
Under Configure smart host authentication settings, select None.
3
Chapter

10
On the Source Server page, click Add and select your Exchange Server that runs the
hub transport role.
11
Click OK, then click Next..
A configuration summary page is displayed.
12
Review your configuration summary. Then , to confirm, click New.
The SMTP Send Connector is created.
22Configuring MS Exchange
Configuring Microsoft® Exchange 2007 and 2010 for outbound mail

Configuring your public
hosted cloud services
This chapter includes the following topics:
■ Configuring Google Apps Email for inbound mail
■ Configuring Google Apps Email for outbound mail
■ Configuring Microsoft® Office 365™ for inbound mail
■ Configuring Microsoft® Office 365™ for outbound mail
Configuring Google Apps Email for inbound mail
Note: The information given here is for guidance only. For the current advice from Google,
refer to the user documentation for Google Apps Email.
By defining a list of IP addresses in the Google Apps Email inbound gateway, you allow email
to come into your organization only through the Email Security service.
The allowable IP ranges are available from the following link: Cloud security services IP ranges.
Note: You must also configure the Email Security service to forward inbound email to Google
Apps Email.
See “Redirecting inbound email traffic to the Email Services infrastructure” on page 13.
The following procedure provides the steps for defining IP address lists in Google Apps Email.
4
Chapter
To configure Google Apps Email for inbound mail
1
Log in to your Google Apps Email administrator console.
2
Select Settings > Email > General Settings.
3
In Inbound Gateway type the Cloud security services IP ranges as a comma-separated
list.
4
Select Only let users receive email from the email gateways listed above.
See “Redirecting inbound email traffic to the Email Services infrastructure” on page 13.
See “Restricting your email traffic” on page 16.
Configuring Google Apps Email for outbound mail
Note: The information given here is for guidance only. For the current advice from Google,
refer to the user documentation for Google Apps Email.
When you configure Google Apps Email to send email to the Internet, you can configure an
outbound gateway to send mail directly to the Internet addresses you specify. In this case
email is sent to the Email Security service.
Note: You must also configure the Email Security service to forward outbound email to Google
Apps Email.
See “About configuring outbound email traffic (optional)” on page 16.
To configure Google Apps Email for outbound mail
1
Log in to your Google Apps Email administrator console.
2
Select Settings > Email > General Settings.
3
In Outbound Gateway type the host name provided by the cloud security services,
typically in the format clusterxout.eu.messagelabs.com.
Configuring Microsoft® Office 365™ for inbound mail
Note: The information given here is for guidance only. For the current advice from Microsoft,
refer to the user documentation for Microsoft® Office 365™ .
24Configuring your public hosted cloud services
Configuring Google Apps Email for outbound mail
There are currently no special recommendations, in addition to the standard recommendations
provided by Microsoft, for setting up Microsoft Office 365™ to accept inbound mail from the
cloud security services.
See “Restricting your email traffic” on page 16.
Configuring Microsoft® Office 365™ for outbound mail
Note: The information given here is for guidance only. For the current advice from Microsoft,
refer to the user documentation for Microsoft® Office 365™ .
When you configure Microsoft® Office 365™ to send email to the Internet, you can configure
an outbound gateway to send mail directly to the Internet addresses you specify. In this case
email is sent to the Enail Security service.
Note: You must also configure the Email Security service to forward outbound email to
Microsoft® Office 365™.
See “About configuring outbound email traffic (optional)” on page 16.
To configure Microsoft® Office 365™ for outbound mail
1
Log in to your Microsoft® Office 365™ Admin Console.
2
Select Administration > Company > Outbound Connector.
3
In Outbound Connectors add a new connector with an appropriate name and description
to forward your outbound emails from designated domains, typically *.*, to the Email
Security.Service.
4
Select Deliver all messages to the following destinations.
5
Type the fully-qualified domanin name as provided by the cloud security services, typically
in the format clusterxout.eu.messagelabs.com.
6
Select Opportunistic TLS.
7
Click Save.
8
Set the connector to Enforce.
25Configuring your public hosted cloud services
Configuring Microsoft® Office 365™ for outbound mail
